WxPython FAQ Widgets
–Ь–∞—В–µ—А–Є–∞–ї –Є–Ј Wiki.crossplatform.ru
In this section, we will introduce basic widgets in wxPython. Each widget will have a small code example.
–°–Њ–і–µ—А–ґ–∞–љ–Є–µ |
wx.Button
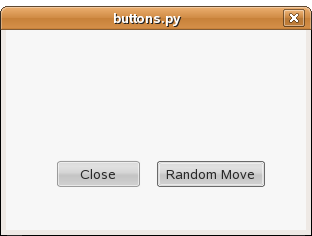
wx.Button is a simple widget. It contains a text string. It is used to trigger an action. wx.Button styles
- wx.BU_LEFT
- wx.BU_TOP
- wx.BU_RIGHT
- wx.BU_BOTTOM
- wx.BU_EXACTFIT
- wx.NO_BORDER
#!/usr/bin/python
# buttons.py

import wx
import random

APP_SIZE_X = 300
APP_SIZE_Y = 200

class MyButtons(wx.Dialog):
    def __init__(self, parent, id, title):
        wx.Dialog.__init__(self, parent, id, title, size=(APP_SIZE_X, APP_SIZE_Y))

        wx.Button(self, 1, 'Close', (50, 130))
        wx.Button(self, 2, 'Random Move', (150, 130), (110, -1))

        self.Bind(wx.EVT_BUTTON, self.OnClose, id=1)
        self.Bind(wx.EVT_BUTTON, self.OnRandomMove, id=2)

        self.Centre()
        self.ShowModal()
        self.Destroy()

    def OnClose(self, event):
        self.Close(True)

    def OnRandomMove(self, event):
        screensize = wx.GetDisplaySize()
        randx = random.randrange(0, screensize.x - APP_SIZE_X)
        randy = random.randrange(0, screensize.y - APP_SIZE_Y)
        self.Move((randx, randy))

app = wx.App(0)
MyButtons(None, -1, 'buttons.py')
app.MainLoop()
wx.ToggleButton
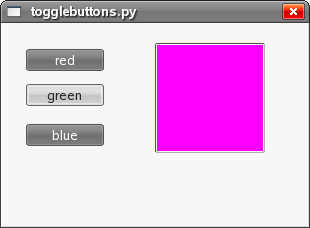
wx.ToggleButton is a button that has two states. Pressed and not pressed. You toggle between these two states by clicking on it. There are situations where this functionality fits well.
#!/usr/bin/python
# togglebuttons.py

import wx

class ToggleButtons(wx.Dialog):
    def __init__(self, parent, id, title):
        wx.Dialog.__init__(self, parent, id, title, size=(300, 200))

        self.colour = wx.Colour(0, 0, 0)

        wx.ToggleButton(self, 1, 'red', (20, 25))
        wx.ToggleButton(self, 2, 'green', (20, 60))
        wx.ToggleButton(self, 3, 'blue', (20, 100))

        self.panel  = wx.Panel(self, -1, (150, 20), (110, 110), style=wx.SUNKEN_BORDER)
        self.panel.SetBackgroundColour(self.colour)

        self.Bind(wx.EVT_TOGGLEBUTTON, self.ToggleRed, id=1)
        self.Bind(wx.EVT_TOGGLEBUTTON, self.ToggleGreen, id=2)
        self.Bind(wx.EVT_TOGGLEBUTTON, self.ToggleBlue, id=3)

        self.Centre()
        self.ShowModal()
        self.Destroy()

    def ToggleRed(self, event):
        green = self.colour.Green()
        blue = self.colour.Blue()
        if  self.colour.Red():
            self.colour.Set(0, green, blue)
        else:
            self.colour.Set(255, green, blue)
        self.panel.SetBackgroundColour(self.colour)

    def ToggleGreen(self, event):
        red = self.colour.Red()
        blue = self.colour.Blue()
        if  self.colour.Green():
            self.colour.Set(red, 0, blue)
        else:
            self.colour.Set(red, 255, blue)
        self.panel.SetBackgroundColour(self.colour)

    def ToggleBlue(self, event):
        red = self.colour.Red()
        green = self.colour.Green()
        if  self.colour.Blue():
            self.colour.Set(red, green, 0)
        else:
            self.colour.Set(red, green, 255)
        self.panel.SetBackgroundColour(self.colour)


app = wx.App()
ToggleButtons(None, -1, 'togglebuttons.py')
app.MainLoop()
wx.BitmapButton
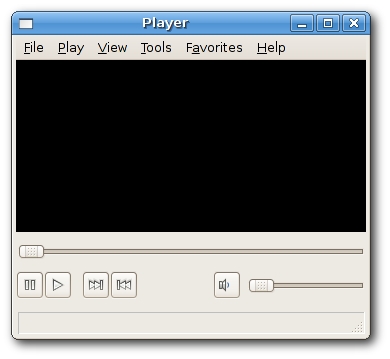
A bitmap button is a button, that displays a bitmap. A bitmap button can have three other states. Selected, focused and displayed. We can set a specific bitmap for those states. A video player is a nice example, where bitmap buttons are used. We can see play, pause, next, previous and volume bitmap buttons there. So we create a skeleton of a video player in our next example.
#!/usr/bin/python
# player.py

import wx

class Player(wx.Frame):
    def __init__(self, parent, id, title):
        wx.Frame.__init__(self, parent, id, title, size=(350, 300))
        panel = wx.Panel(self, -1)

        pnl1 = wx.Panel(self, -1)
        pnl1.SetBackgroundColour(wx.BLACK)
        pnl2 = wx.Panel(self, -1 )

        menubar = wx.MenuBar()
        file = wx.Menu()
        play = wx.Menu()
        view = wx.Menu()
        tools = wx.Menu()
        favorites = wx.Menu()
        help = wx.Menu()

        file.Append(101, '&quit', 'Quit application')

        menubar.Append(file, '&File')
        menubar.Append(play, '&Play')
        menubar.Append(view, '&View')
        menubar.Append(tools, '&Tools')
        menubar.Append(favorites, 'F&avorites')
        menubar.Append(help, '&Help')

        self.SetMenuBar(menubar)

        slider1 = wx.Slider(pnl2, -1, 0, 0, 1000)
        pause = wx.BitmapButton(pnl2, -1, wx.Bitmap('icons/stock_media-pause.png'))
        play  = wx.BitmapButton(pnl2, -1, wx.Bitmap('icons/stock_media-play.png'))
        next  = wx.BitmapButton(pnl2, -1, wx.Bitmap('icons/stock_media-next.png'))
        prev  = wx.BitmapButton(pnl2, -1, wx.Bitmap('icons/stock_media-prev.png'))
        volume = wx.BitmapButton(pnl2, -1, wx.Bitmap('icons/volume.png'))
        slider2 = wx.Slider(pnl2, -1, 0, 0, 100, size=(120, -1))

        vbox = wx.BoxSizer(wx.VERTICAL)
        hbox1 = wx.BoxSizer(wx.HORIZONTAL)
        hbox2 = wx.BoxSizer(wx.HORIZONTAL)

        hbox1.Add(slider1, 1)
        hbox2.Add(pause)
        hbox2.Add(play, flag=wx.RIGHT, border=5)
        hbox2.Add(next, flag=wx.LEFT, border=5)
        hbox2.Add(prev)
        hbox2.Add((-1, -1), 1)
        hbox2.Add(volume)
        hbox2.Add(slider2, flag=wx.TOP | wx.LEFT, border=5)

        vbox.Add(hbox1, flag=wx.EXPAND | wx.BOTTOM, border=10)
        vbox.Add(hbox2, 1, wx.EXPAND)
        pnl2.SetSizer(vbox)

        sizer = wx.BoxSizer(wx.VERTICAL)
        sizer.Add(pnl1, 1, flag=wx.EXPAND)
        sizer.Add(pnl2, flag=wx.EXPAND | wx.BOTTOM | wx.TOP, border=10)

        self.SetMinSize((350, 300))
        self.CreateStatusBar()
        self.SetSizer(sizer)

        self.Centre()
        self.Show()


app = wx.App()
Player(None, -1, 'Player')
app.MainLoop()
pause = wx.BitmapButton(pnl2, -1, wx.Bitmap('icons/stock_media-pause.png'))
The creation of the wx.BitmapButton is self explanatory.
 hbox2.Add(prev)
 hbox2.Add((-1, -1), 1)
 hbox2.Add(volume)
Here we put some space between the previous button and the volume button. The proportion is set to 1. This means, that the space will grow, when we resize the window.
self.SetMinSize((350, 300))
Here we set the minimum size of the player. It does not make much sense to shrink the window below some value.
wx.StaticLine
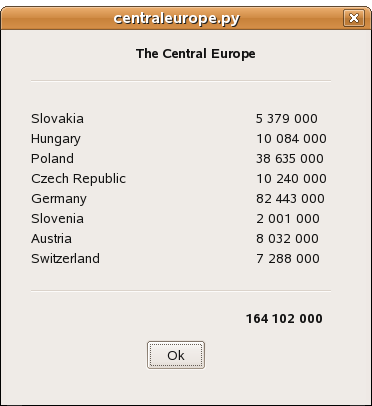
This widget displays a simple line on the window. It can be horizontal or vertical. centraleurope.py script displays central european countries and their population. The wx.StatLine makes it look more visually attractive.
wx.StaticLine styles
- wx.LI_HORIZONTAL
- wx.LI_VERTICAL
#!/usr/bin/python
# centraleurope.py

import wx

class CentralEurope(wx.Dialog):
    def __init__ (self, parent, ID, title):
        wx.Dialog.__init__(self, parent, ID, title, size=(360, 370))

        font = wx.Font(10, wx.DEFAULT, wx.NORMAL, wx.BOLD)
        heading = wx.StaticText(self, -1, 'The Central Europe', (130, 15))
        heading.SetFont(font)

        wx.StaticLine(self, -1, (25, 50), (300,1))

        wx.StaticText(self, -1, 'Slovakia', (25, 80))
        wx.StaticText(self, -1, 'Hungary', (25, 100))
        wx.StaticText(self, -1, 'Poland', (25, 120))
        wx.StaticText(self, -1, 'Czech Republic', (25, 140))
        wx.StaticText(self, -1, 'Germany', (25, 160))
        wx.StaticText(self, -1, 'Slovenia', (25, 180))
        wx.StaticText(self, -1, 'Austria', (25, 200))
        wx.StaticText(self, -1, 'Switzerland', (25, 220))

        wx.StaticText(self, -1, '5 379 000', (250, 80))
        wx.StaticText(self, -1, '10 084 000', (250, 100))
        wx.StaticText(self, -1, '38 635 000', (250, 120))
        wx.StaticText(self, -1, '10 240 000', (250, 140))
        wx.StaticText(self, -1, '82 443 000', (250, 160))
        wx.StaticText(self, -1, '2 001 000', (250, 180))
        wx.StaticText(self, -1, '8 032 000', (250, 200))
        wx.StaticText(self, -1, '7 288 000', (250, 220))

        wx.StaticLine(self, -1, (25, 260), (300,1))

        sum = wx.StaticText(self, -1, '164 102 000', (240, 280))
        sum_font = sum.GetFont()
        sum_font.SetWeight(wx.BOLD)
        sum.SetFont(sum_font)

        wx.Button(self, 1, 'Ok', (140, 310), (60, 30))

        self.Bind(wx.EVT_BUTTON, self.OnOk, id=1)

        self.Centre()
        self.ShowModal()
        self.Destroy()

    def OnOk(self, event):
        self.Close()

app = wx.App()
CentralEurope(None, -1, 'centraleurope.py')
app.MainLoop()
wx.StaticText
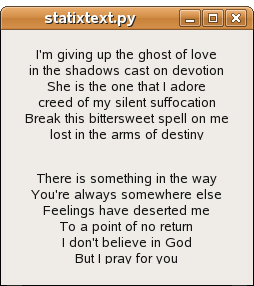
A wx.StaticText widget displays one or more lines of read-only text.
wx.StaticText Styles:
- wx.ALIGN_RIGHT
- iwx.ALIGN_LEFT
- wx.ALIGN_CENTER / wx.ALIGN_CENTRE
- wx.ST_NO_AUTORESIZE
#!/usr/bin/python
# statictext.py

import wx

class StaticText(wx.Frame):
    def __init__(self, parent, id, title):
        wx.Frame.__init__(self, parent, id, title)

        lyrics1 = '''I'm giving up the ghost of love
in the shadows cast on devotion
She is the one that I adore
creed of my silent suffocation
Break this bittersweet spell on me
lost in the arms of destiny'''

        lyrics2 = '''There is something in the way
You're always somewhere else
Feelings have deserted me
To a point of no return
I don't believe in God
But I pray for you'''

        vbox = wx.BoxSizer(wx.VERTICAL)
        panel = wx.Panel(self, -1)
        st1 = wx.StaticText(panel, -1, lyrics1, style=wx.ALIGN_CENTRE)
        st2 = wx.StaticText(panel, -1, lyrics2, style=wx.ALIGN_CENTRE)
        vbox.Add(st1, 1, wx.EXPAND |  wx.TOP | wx.BOTTOM, 15)
        vbox.Add(st2, 1, wx.EXPAND |  wx.TOP | wx.BOTTOM, 15)
        panel.SetSizer(vbox)
        self.Centre()
        self.Show(True)


app = wx.App()
StaticText(None, -1, 'statixtext.py')
app.MainLoop()
wx.StaticBox
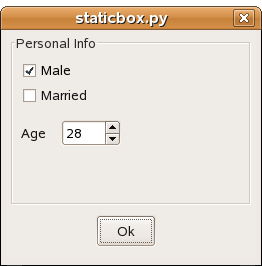
This is a kind of a decorator widget. It is used to logically group various widgets. Note that this widget must be created before the widgets that it contains, and that those widgets should be siblings, not children, of the static box.
#!/usr/bin/python
# staticbox.py

import wx

class StaticBox(wx.Dialog):
    def __init__(self, parent, id, title):
        wx.Dialog.__init__(self, parent, id, title, size=(250, 230))

        wx.StaticBox(self, -1, 'Personal Info', (5, 5), size=(240, 170))
        wx.CheckBox(self, -1 ,'Male', (15, 30))
        wx.CheckBox(self, -1 ,'Married', (15, 55))
        wx.StaticText(self, -1, 'Age', (15, 95))
        wx.SpinCtrl(self, -1, '1', (55, 90), (60, -1), min=1, max=120)
        wx.Button(self, 1, 'Ok', (90, 185), (60, -1))

        self.Bind(wx.EVT_BUTTON, self.OnClose, id=1)

        self.Centre()
        self.ShowModal()
        self.Destroy()

    def OnClose(self, event):
        self.Close()

app = wx.App()
StaticBox(None, -1, 'staticbox.py')
app.MainLoop()
wx.ComboBox
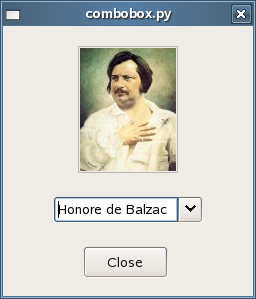
wx.ComboBox is a combination of a single line text field, a button with a down arrow image and a listbox. When you press the button, a listbox appears. User can select only one option from the supplied string list.
wx.ComboBox has the following constructor:
 wx.ComboBox(int id, string value='', wx.Point pos=wx.DefaultPosition, wx.Size size=wx.DefaultSize,
    wx.List choices=wx.EmptyList, int style=0, wx.Validator validator=wx.DefaultValidator,
    string name=wx.ComboBoxNameStr)
wx.ComboBox styles
- wx.CB_DROPDOWN
- wx.CB_READONLY
- wx.CB_SORT
#!/usr/bin/python
# combobox.py

import wx

class ComboBox(wx.Dialog):
    def __init__(self, parent, id, title):
        wx.Dialog.__init__(self, parent, id, title, size=(250, 270))

        panel = wx.Panel(self, -1, (75, 20), (100, 127), style=wx.SUNKEN_BORDER)
        self.picture = wx.StaticBitmap(panel)
        panel.SetBackgroundColour(wx.WHITE)

        self.images = ['tolstoy.jpg', 'feuchtwanger.jpg', 'balzac.jpg', 'pasternak.jpg',
                    'galsworthy.jpg', 'wolfe.jpg', 'zweig.jpg']
        authors = ['Leo Tolstoy', 'Lion Feuchtwanger', 'Honore de Balzac',
		'Boris Pasternak', 'John Galsworthy', 'Tom Wolfe', 'Stefan Zweig']

        wx.ComboBox(self, -1, pos=(50, 170), size=(150, -1), choices=authors,
					style=wx.CB_READONLY)
        wx.Button(self, 1, 'Close', (80, 220))

        self.Bind(wx.EVT_BUTTON, self.OnClose, id=1)
        self.Bind(wx.EVT_COMBOBOX, self.OnSelect)

        self.Centre()
        self.ShowModal()
        self.Destroy()

    def OnClose(self, event):
        self.Close()

    def OnSelect(self, event):
        item = event.GetSelection()
        self.picture.SetFocus()
        self.picture.SetBitmap(wx.Bitmap('images/' + self.images[item]))


app = wx.App()
ComboBox(None, -1, 'combobox.py')
app.MainLoop()
wx.CheckBox
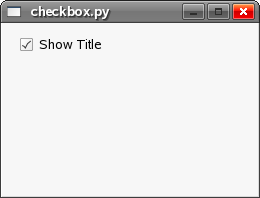
wx.CheckBox is a widget that has two states. On and Off. It is a box with a label. The label can be set to the right or to the left of the box. If the checkbox is checked, it is represented by a tick in a box.
wx.CheckBox Styles
- wx.ALIGN_RIGHT
#!/usr/bin/python
# checkbox.py

import wx

class CheckBox(wx.Frame):
    def __init__(self, parent, id, title):
        wx.Frame.__init__(self, parent, id, title, size=(250, 170))

        panel = wx.Panel(self, -1)
        self.cb = wx.CheckBox(panel, -1, 'Show Title', (10, 10))
        self.cb.SetValue(True)

        wx.EVT_CHECKBOX(self, self.cb.GetId(), self.ShowTitle)

        self.Show()
        self.Centre()

    def ShowTitle(self, event):
        if self.cb.GetValue():
            self.SetTitle('checkbox.py')
        else: self.SetTitle('')


app = wx.App()
CheckBox(None, -1, 'checkbox.py')
app.MainLoop()
wx.StatusBar
As it's name indicates, the wx.StatusBar widget is used to display application status information. It can be divided into several parts to show different kind of information. We can insert other widgets into the wx.StatusBar. It can be used as an alternative to dialogs, since dialogs are ofted abused and they are disliked by most users.
We can create a wx.StatusBar in two ways. We can manually create our own wx.StatusBar and call SetStatusBar() method or we can simply call the CreateStatusBar() method. The latter method creates a default wx.StatusBar for us.
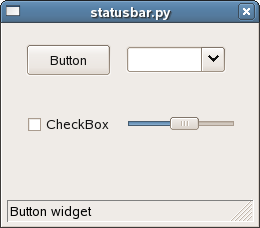
In our example, we have a wx.Frame widget and five other widgets. If we hover a mouse pointer over a widget, it's description is shown on the wx.StatusBar
#!/usr/bin/python
# statusbar.py

import wx

class Statusbar(wx.Frame):
    def __init__(self, parent, id, title):
        wx.Frame.__init__(self, parent, id, title, size=(250, 200),
	style=wx.CAPTION | wx.SYSTEM_MENU | wx.CLOSE_BOX)

        panel = wx.Panel(self, 1)

        button = wx.Button(panel, 2, 'Button', (20, 20))
        text = wx.CheckBox(panel, 3, 'CheckBox', (20, 90))
        combo = wx.ComboBox(panel, 4, '', (120, 22))
        slider = wx.Slider(panel, 5, 6, 1, 10, (120, 90), (110, -1))

        panel.Bind(wx.EVT_ENTER_WINDOW, self.EnterPanel, id=1)
        button.Bind(wx.EVT_ENTER_WINDOW, self.EnterButton, id=2)
        text.Bind(wx.EVT_ENTER_WINDOW, self.EnterText, id=3)
        combo.Bind(wx.EVT_ENTER_WINDOW, self.EnterCombo, id=4)
        slider.Bind(wx.EVT_ENTER_WINDOW, self.EnterSlider, id=5)

        self.sb = self.CreateStatusBar()
        self.SetMaxSize((250, 200))
        self.SetMinSize((250, 200))
        self.Show(True)
        self.Centre()

    def EnterButton(self, event):
        self.sb.SetStatusText('Button widget')
        event.Skip()

    def EnterPanel(self, event):
        self.sb.SetStatusText('Panel widget')
        event.Skip()

    def EnterText(self, event):
        self.sb.SetStatusText('CheckBox widget')
        event.Skip()

    def EnterCombo(self, event):
        self.sb.SetStatusText('ComboBox widget')
        event.Skip()

    def EnterSlider(self, event):
        self.sb.SetStatusText('Slider widget')
        event.Skip()

app = wx.App()
Statusbar(None, -1, 'statusbar.py')
app.MainLoop()
wx.RadioButton
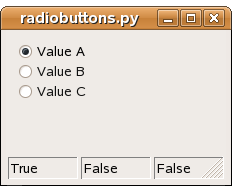
wx.RadioButton is a widget that allows the user to select a single exclusive choice from a group of options. A group of radio buttons is defined by having the first RadioButton in the group contain the wx.RB_GROUP style. All other RadioButtons defined after the first RadioButton with this style flag is set will be added to the function group of the first RadioButton. Declaring another RadioButton with the wx.RB_GROUP flag will start a new radio button group.
wx.RadioButton Styles
- wx.RB_GROUP
- wx.RB_SINGLE
- wx.CB_SORT
#!/usr/bin/python
# radiobuttons.py

import wx

class RadioButtons(wx.Frame):
    def __init__(self, parent, id, title, size=(210, 150)):
        wx.Frame.__init__(self, parent, id, title)
        panel = wx.Panel(self, -1)
        self.rb1 = wx.RadioButton(panel, -1, 'Value A', (10, 10), style=wx.RB_GROUP)
        self.rb2 = wx.RadioButton(panel, -1, 'Value B', (10, 30))
        self.rb3 = wx.RadioButton(panel, -1, 'Value C', (10, 50))

        self.Bind(wx.EVT_RADIOBUTTON, self.SetVal, id=self.rb1.GetId())
        self.Bind(wx.EVT_RADIOBUTTON, self.SetVal, id=self.rb2.GetId())
        self.Bind(wx.EVT_RADIOBUTTON, self.SetVal, id=self.rb3.GetId())

        self.statusbar = self.CreateStatusBar(3)
        self.SetVal(True)
        self.Centre()
        self.Show(True)

    def SetVal(self, event):
        state1 = str(self.rb1.GetValue())
        state2 = str(self.rb2.GetValue())
        state3 = str(self.rb3.GetValue())

        self.statusbar.SetStatusText(state1, 0)
        self.statusbar.SetStatusText(state2, 1)
        self.statusbar.SetStatusText(state3, 2)


app = wx.App()
RadioButtons(None, -1, 'radiobuttons.py')
app.MainLoop()
wx.Gauge
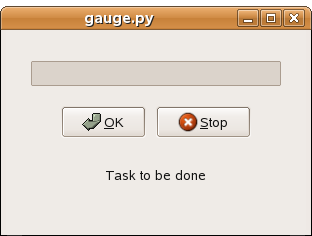
wx.Gauge is a widget that is used, when we process lengthy tasks.
wx.Gauge styles
- wx.GA_HORIZONTAL
- wx.GA_VERTICAL
# gauge.py

import wx

class Gauge(wx.Frame):
    def __init__(self, parent, id, title):
        wx.Frame.__init__(self, parent, id, title, size=(300, 200))

        self.timer = wx.Timer(self, 1)
        self.count = 0

        self.Bind(wx.EVT_TIMER, self.OnTimer, self.timer)

        panel = wx.Panel(self, -1)
        vbox = wx.BoxSizer(wx.VERTICAL)
        hbox1 = wx.BoxSizer(wx.HORIZONTAL)
        hbox2 = wx.BoxSizer(wx.HORIZONTAL)
        hbox3 = wx.BoxSizer(wx.HORIZONTAL)

        self.gauge = wx.Gauge(panel, -1, 50, size=(250, 25))
        self.btn1 = wx.Button(panel, wx.ID_OK)
        self.btn2 = wx.Button(panel, wx.ID_STOP)
        self.text = wx.StaticText(panel, -1, 'Task to be done')

        self.Bind(wx.EVT_BUTTON, self.OnOk, self.btn1)
        self.Bind(wx.EVT_BUTTON, self.OnStop, self.btn2)

        hbox1.Add(self.gauge, 1, wx.ALIGN_CENTRE)
        hbox2.Add(self.btn1, 1, wx.RIGHT, 10)
        hbox2.Add(self.btn2, 1)
        hbox3.Add(self.text, 1)
        vbox.Add((0, 30), 0)
        vbox.Add(hbox1, 0, wx.ALIGN_CENTRE)
        vbox.Add((0, 20), 0)
        vbox.Add(hbox2, 1, wx.ALIGN_CENTRE)
        vbox.Add(hbox3, 1, wx.ALIGN_CENTRE)

        panel.SetSizer(vbox)
        self.Centre()
        self.Show(True)

    def OnOk(self, event):
        if self.count >= 50:
            return
        self.timer.Start(100)
        self.text.SetLabel('Task in Progress')

    def OnStop(self, event):
        if self.count == 0 or self.count >= 50 or not self.timer.IsRunning():
            return
        self.timer.Stop()
	    self.text.SetLabel('Task Interrupted')
        wx.Bell()

    def OnTimer(self, event):
        self.count = self.count +1
        self.gauge.SetValue(self.count)
        if self.count == 50:
            self.timer.Stop()
            self.text.SetLabel('Task Completed')

app = wx.App()
Gauge(None, -1, 'gauge.py')
app.MainLoop()
wx.Slider
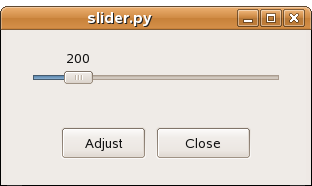
wx.Slider is a widget that has a simple handle. This handle can be pulled back and forth. This way we are choosing a value for a specific task. Say we want to input into our application the age of a customer. For this purpose, wx.Slider might be a good choice.
wx.Slider styles
- wxSL_HORIZONTAL
- wxSL_VERTICAL
- wxSL_AUTOTICKS
- wxSL_LABELS
- wxSL_LEFT
- wxSL_RIGHT
- wxSL_TOP
- wxSL_BOTTOM
- wxSL_INVERSE
#!/usr/bin/python
# slider.py

import wx

class Slider(wx.Frame):
    def __init__(self, parent, id, title):
        wx.Frame.__init__(self, parent, id, title, size=(300, 150))

        panel = wx.Panel(self, -1)
        vbox = wx.BoxSizer(wx.VERTICAL)
        hbox = wx.BoxSizer(wx.HORIZONTAL)

        self.sld = wx.Slider(panel, -1, 200, 150, 500, (-1, -1), (250, -1),
		wx.SL_AUTOTICKS | wx.SL_HORIZONTAL | wx.SL_LABELS)
        btn1 = wx.Button(panel, 1, 'Adjust')
        btn2 = wx.Button(panel, 2,  'Close')

        wx.EVT_BUTTON(self, 1, self.OnOk)
        wx.EVT_BUTTON(self, 2, self.OnClose)

        vbox.Add(self.sld, 1, wx.ALIGN_CENTRE)
        hbox.Add(btn1, 1, wx.RIGHT, 10)
        hbox.Add(btn2, 1)
        vbox.Add(hbox, 0, wx.ALIGN_CENTRE | wx.ALL, 20)
        panel.SetSizer(vbox)
        self.Centre()
        self.Show(True)

    def OnOk(self, event):
        val = self.sld.GetValue()
        self.SetSize((val*2, val))

    def OnClose(self, event):
        self.Close()

app = wx.App()
Slider(None, -1, 'slider.py')
app.MainLoop()
wx.ListBox
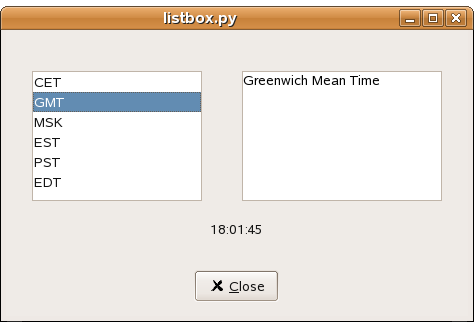
wx.Listbox is a widget that consists of a scrolling box and a list of items. User can select one or more items from that list. It depends on whether it is created as a single or multiple selection box. Selected items are marked. listbox.py example consists of four different widgets. wx.Listbox, wx.TextCtrl, wx.StaticText and wx.Button. Widgets are organized with sizer-s. wx.Listbox has a list of six different world times. These abbreviations are explained in the second wx.TextCtrl. Current time is displayed in the wx.StaticText widget. wx.Timer widget is used to update the time every 100 miliseconds.
#!/usr/bin/python
# listbox.py

import wx
from time import *

class Listbox(wx.Frame):
    def __init__(self, parent, id, title):
        wx.Frame.__init__(self, parent, id, title, size=(550, 350))

        zone_list = ['CET', 'GMT', 'MSK', 'EST', 'PST', 'EDT']

        self.full_list = {
            'CET': 'Central European Time',
            'GMT': 'Greenwich Mean Time',
            'MSK': 'Moscow Time',
            'EST': 'Eastern Standard Time',
            'PST': 'Pacific Standard Time',
            'EDT': 'Eastern Daylight Time'
        }

        self.time_diff = {
            'CET' : 1,
            'GMT' : 0,
            'MSK': 3,
            'EST': -5,
            'PST': -8,
            'EDT': -4
        }

        vbox = wx.BoxSizer(wx.VERTICAL)
        hbox1 = wx.BoxSizer(wx.HORIZONTAL)
        hbox2 = wx.BoxSizer(wx.HORIZONTAL)
        hbox3 = wx.BoxSizer(wx.HORIZONTAL)

        self.timer = wx.Timer(self, 1)
        self.diff = 0

        panel = wx.Panel(self, -1)

        self.time_zones = wx.ListBox(panel, 26, (-1, -1), (170, 130),
		zone_list, wx.LB_SINGLE)
        self.time_zones.SetSelection(0)
        self.text = wx.TextCtrl(panel, -1, 'Central European Time',
		size=(200, 130), style=wx.TE_MULTILINE)
        self.time = wx.StaticText(panel, -1, '')
        btn = wx.Button(panel, wx.ID_CLOSE, 'Close')
        hbox1.Add(self.time_zones, 0, wx.TOP, 40)
        hbox1.Add(self.text, 1, wx.LEFT | wx.TOP, 40)
        hbox2.Add(self.time, 1, wx.ALIGN_CENTRE)
        hbox3.Add(btn, 0, wx.ALIGN_CENTRE)
        vbox.Add(hbox1, 0, wx.ALIGN_CENTRE)
        vbox.Add(hbox2, 1, wx.ALIGN_CENTRE)
        vbox.Add(hbox3, 1, wx.ALIGN_CENTRE)

        panel.SetSizer(vbox)

        self.timer.Start(100)

        wx.EVT_BUTTON(self, wx.ID_CLOSE, self.OnClose)
        wx.EVT_LISTBOX(self, 26, self.OnSelect)
        wx.EVT_TIMER(self, 1, self.OnTimer)

        self.Show(True)
        self.Centre()

    def OnClose(self, event):
        self.Close()

    def OnSelect(self, event):
        index = event.GetSelection()
        time_zone = self.time_zones.GetString(index)
        self.diff = self.time_diff[time_zone]
        self.text.SetValue(self.full_list[time_zone])

    def OnTimer(self, event):
        ct = gmtime()
        print_time = (ct[0], ct[1], ct[2], ct[3]+self.diff,
			ct[4], ct[5], ct[6], ct[7], -1)
        self.time.SetLabel(strftime("%H:%M:%S", print_time))


app = wx.App()
Listbox(None, -1, 'listbox.py')
app.MainLoop()
wx.SpinCtrl
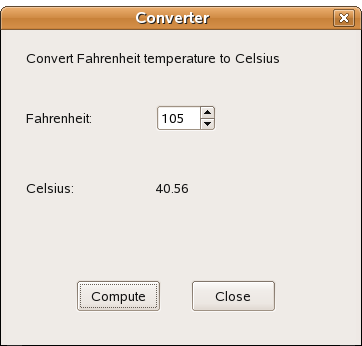
This widget lets you increment and decrement a value. It has two up and down arrow buttons for this purpose. User can enter a value into a box or increment/decrement it by these two arrows. Converter script converts Fahrenheit temperature to Celsius. This example is very popular and can be found in most programming primer books. So I made a wxPython example as well.
wx.SpinCtrl styles
- wx.SP_ARROW_KEYS
- wx.SP_WRAP
#!/usr/bin/python
# spinctrl.py

import wx

class Converter(wx.Dialog):
    def __init__(self, parent, id, title):
        wx.Dialog.__init__(self, parent, id, title, size=(350, 310))

        wx.StaticText(self, -1, 'Convert Fahrenheit temperature to Celsius', (20,20))
        wx.StaticText(self, -1, 'Fahrenheit: ', (20, 80))
        wx.StaticText(self, -1, 'Celsius: ', (20, 150))
        self.celsius =  wx.StaticText(self, -1, '', (150, 150))
        self.sc = wx.SpinCtrl(self, -1, '',  (150, 75), (60, -1))
        self.sc.SetRange(-459, 1000)
        self.sc.SetValue(0)
        compute_btn = wx.Button(self, 1, 'Compute', (70, 250))
        compute_btn.SetFocus()
        clear_btn = wx.Button(self, 2, 'Close', (185, 250))

        wx.EVT_BUTTON(self, 1, self.OnCompute)
        wx.EVT_BUTTON(self, 2, self.OnClose)
        wx.EVT_CLOSE(self, self.OnClose)

        self.Centre()
        self.ShowModal()
        self.Destroy()

    def OnCompute(self, event):
        fahr = self.sc.GetValue()
        cels = round((fahr-32)*5/9.0, 2)
        self.celsius.SetLabel(str(cels))

    def OnClose(self, event):
        self.Destroy()

app = wx.App()
Converter(None, -1, 'Converter')
app.MainLoop()
wx.SplitterWindow
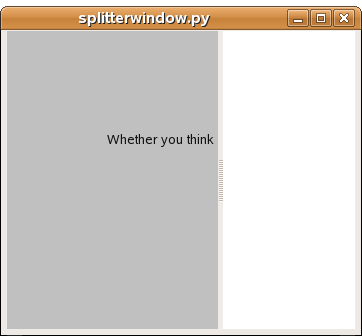
This widget enables to split the main area of an application into parts. The user can dynamically resize those parts with the mouse pointer. Such a solution can be seen in mail clients (evolution) or in burning software (k3b). You can split an area vertically or horizontally.
#!/usr/bin/python
# splitterwindow.py

import wx

class Splitterwindow(wx.Frame):
    def __init__(self, parent, id, title):
        wx.Frame.__init__(self, parent, id, title, size=(350, 300))

        quote = '''Whether you think that you can, or that you can't, you are
usually right'''

        splitter = wx.SplitterWindow(self, -1)
        panel1 = wx.Panel(splitter, -1)
        wx.StaticText(panel1, -1, quote, (100, 100), style=wx.ALIGN_CENTRE)

        panel1.SetBackgroundColour(wx.LIGHT_GREY)
        panel2 = wx.Panel(splitter, -1)
        panel2.SetBackgroundColour(wx.WHITE)
        splitter.SplitVertically(panel1, panel2)
        self.Centre()
        self.Show(True)

app = wx.App()
Splitterwindow(None, -1, 'splitterwindow.py')
app.MainLoop()
wx.ScrolledWindow
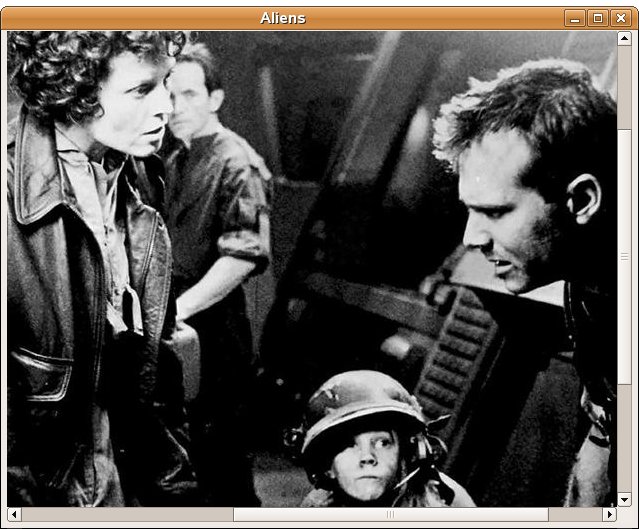
This is one of the container widgets. It can be useful, when we have a larger area than a window can display. In our example, we demonstrate such a case. We place a large image into our window. When the window is smaller than our image, Scrollbars are displayed automatically.
#!/usr/bin/python
# scrolledwindow.py

import wx

class ScrolledWindow(wx.Frame):
    def __init__(self, parent, id, title):
        wx.Frame.__init__(self, parent, id, title, size=(500, 400))

        sw = wx.ScrolledWindow(self)
        bmp = wx.Image('images/aliens.jpg',wx.BITMAP_TYPE_JPEG).ConvertToBitmap()
        wx.StaticBitmap(sw, -1, bmp)
        sw.SetScrollbars(20, 20, 55, 40)
        sw.Scroll(50,10)
        self.Centre()
        self.Show()

app = wx.App()
ScrolledWindow(None, -1, 'Aliens')
app.MainLoop()
The SetScrollbars() method creates horizontal and vertical scrollbars. By calling the Scroll() method we programmatically scroll to the given position.
wx.Notebook
wx.Notebook widget joins multiple windows with corresponding tabs.
You can position the Notebook widget using the following style flags:
- wx.NB_LEFT
- wx.NB_RIGHT
- wx.NB_TOP
- wx.NB_BOTTOM
The default position is wx.NB_TOP.
#!/usr/bin/python
# notebook.py

import wx
import wx.lib.sheet as sheet

class MySheet(sheet.CSheet):
    def __init__(self, parent):
        sheet.CSheet.__init__(self, parent)
        self.SetNumberRows(50)
        self.SetNumberCols(50)

class Notebook(wx.Frame):
    def __init__(self, parent, id, title):
        wx.Frame.__init__(self, parent, id, title, size=(600, 500))
        menubar = wx.MenuBar()
        file = wx.Menu()
        file.Append(101, 'Quit', '' )
        menubar.Append(file, '&File')
        self.SetMenuBar(menubar)

        wx.EVT_MENU(self, 101, self.OnQuit)

        nb = wx.Notebook(self, -1, style=wx.NB_BOTTOM)
        self.sheet1 = MySheet(nb)
        self.sheet2 = MySheet(nb)
        self.sheet3 = MySheet(nb)

        nb.AddPage(self.sheet1, 'Sheet1')
        nb.AddPage(self.sheet2, 'Sheet2')
        nb.AddPage(self.sheet3, 'Sheet3')

        self.sheet1.SetFocus()
        self.StatusBar()
        self.Centre()
        self.Show()

    def StatusBar(self):
        self.statusbar = self.CreateStatusBar()

    def OnQuit(self, event):
        self.Close()

app = wx.App()
Notebook(None, -1, 'notebook.py')
app.MainLoop()
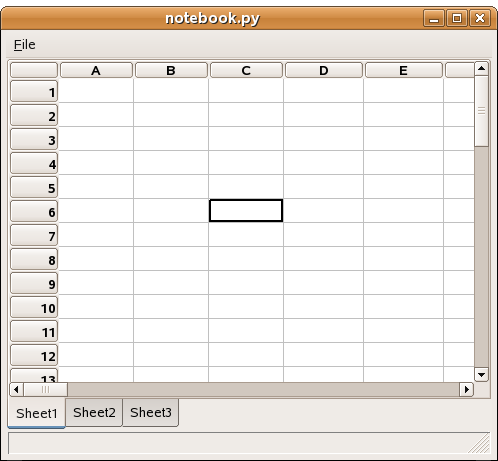
In our example we create a notebook widget with wx.NB_BOTTOM style. It is therefore positioned on the bottom of the frame accordingly. We add various widgets into the notebook widget with the AddPage() method. We put simple spreadsheet widgets. A Spreadsheet widget can be foung in wx.lib.sheet module.
wx.Panel
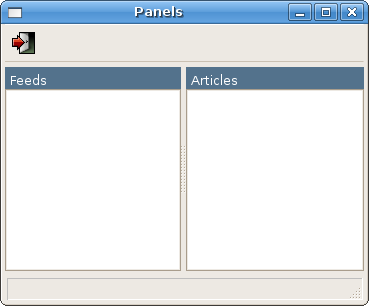
wx.Panel is a basic parent widget. It adds some basic functionality to the wx.Window widget, which is usually not used directly. Normally we create a wx.Frame widget first. Then we place a wx.Panel widget inside this frame. Then we place widgets on the panel. This is the common scenario. However, we can also combine panels to create interesting interface. In the following example we create a two side window with headers. We use altogether six different wx.Panel widgets.
#!/usr/bin/python
# panels.py

import wx

class Panels(wx.Frame):
    def __init__(self, parent, id, title):
        wx.Frame.__init__(self, parent, id, title)

        hbox = wx.BoxSizer(wx.HORIZONTAL)
        splitter = wx.SplitterWindow(self, -1)

        vbox1 = wx.BoxSizer(wx.VERTICAL)
        panel1 = wx.Panel(splitter, -1)
        panel11 = wx.Panel(panel1, -1, size=(-1, 40))
        panel11.SetBackgroundColour('#53728c')
        st1 = wx.StaticText(panel11, -1, 'Feeds', (5, 5))
        st1.SetForegroundColour('WHITE')

        panel12 = wx.Panel(panel1, -1, style=wx.BORDER_SUNKEN)
        panel12.SetBackgroundColour('WHITE')

        vbox1.Add(panel11, 0, wx.EXPAND)
        vbox1.Add(panel12, 1, wx.EXPAND)

        panel1.SetSizer(vbox1)

        vbox2 = wx.BoxSizer(wx.VERTICAL)
        panel2 = wx.Panel(splitter, -1)
        panel21 = wx.Panel(panel2, -1, size=(-1, 40), style=wx.NO_BORDER)
        st2 = wx.StaticText(panel21, -1, 'Articles', (5, 5))
        st2.SetForegroundColour('WHITE')

        panel21.SetBackgroundColour('#53728c')
        panel22 = wx.Panel(panel2, -1, style=wx.BORDER_RAISED)

        panel22.SetBackgroundColour('WHITE')
        vbox2.Add(panel21, 0, wx.EXPAND)
        vbox2.Add(panel22, 1, wx.EXPAND)

        panel2.SetSizer(vbox2)

        toolbar = self.CreateToolBar()
        toolbar.AddLabelTool(1, 'Exit', wx.Bitmap('icons/stock_exit.png'))
        toolbar.Realize()
        self.Bind(wx.EVT_TOOL, self.ExitApp, id=1)

        hbox.Add(splitter, 1, wx.EXPAND | wx.TOP | wx.BOTTOM, 5)
        self.SetSizer(hbox)
        self.CreateStatusBar()
        splitter.SplitVertically(panel1, panel2)
        self.Centre()
        self.Show(True)


    def ExitApp(self, event):
        self.Close()

app = wx.App()
Panels(None, -1, 'Panels')
app.MainLoop()
 hbox = wx.BoxSizer(wx.HORIZONTAL)
 splitter = wx.SplitterWindow(self, -1)
The wx.SplitterWindow will split our window into two parts.
One panel will be placed on the left and one on the right side. Each one will have other two panels. One will create a header and the other one will take up the rest of the parent panel. Together we will use six panels.
 panel11 = wx.Panel(panel1, -1, size=(-1, 40))
 panel11.SetBackgroundColour('#53728c')
 st1 = wx.StaticText(panel11, -1, 'Feeds', (5, 5))
 st1.SetForegroundColour('WHITE')
 ...
 vbox1.Add(panel11, 0, wx.EXPAND)
Here we create the header panel. The header height is 40px. The color is set to dark blue. (#53728c) We put a wx.StaticText inside the header panel. The position is 5px from left and 5px from top so that we have some space between the panel and the static text. The color of the static text is set to white. In the end, we make the panel11 expandable and set the proportion to 0.
 panel12 = wx.Panel(panel1, -1, style=wx.BORDER_SUNKEN)
 panel12.SetBackgroundColour('WHITE')
 ...
 vbox1.Add(panel12, 1, wx.EXPAND)
The bottom panel is created with wx.BORDER_SUNKEN style. The color is set to white. We make it expandable and set the proportion parameter to 1.
