WxPython FAQ GDI
–Ь–∞—В–µ—А–Є–∞–ї –Є–Ј Wiki.crossplatform.ru
The GDI (Graphics Device Interface) is an interface for working with graphics. It is used to interact with graphic devices such as monitor, printer or a file. The GDI allows programmers to display data on a screen or printer without having to be concerned about the details of a particular device. The GDI insulates the programmer from the hardware.
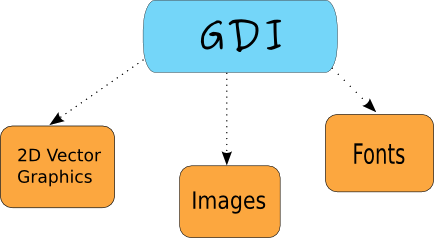
From the programmer's point of view, the GDI is a group of classes and methods for working with graphics. The GDI consists of 2D Vector Graphics, Fonts and Images.
To begin drawing graphics, we must create a device context (DC) object. In wxPython the device context is called wx.DC. The documentation defines wx.DC as a device context onto which which graphics and text can be drawn. It represents number of devices in a generic way. Same piece of code can write to different kinds of devices. Be it a screen or a printer. The wx.DC is not intended to be used directly. Instead a programmer should choose one of the derived classes. Each derived class is intended to be used under specific conditions.
Derived wx.DC classes* wxBufferedDC
- wxBufferedPaintDC
- wxPostScriptDC
- wxMemoryDC
- wxPrinterDC
- wxScreenDC
- wxClientDC
- wxPaintDC
- wxWindowDC
The wx.ScreenDC is used to draw anywhere on the screen. The wx.WindowDC is used if we want to paint on the whole window (Windows only). This includes window decorations. The wx.ClientDC is used to draw on the client area of a window. The client area is the area of a window without it's decorations (title and border). The wx.PaintDC is used to draw on the client area as well. But there is one difference between the wx.PaintDC and the wx.ClientDC. The wx.PaintDC should be used only from a wx.PaintEvent. The wx.ClientDC shoud not be used from a wx.PaintEvent.
The wx.MemoryDC is used to draw graphics on the bitmap. The wx.PostScriptDC is used to write to PostScript files on any platform. The wx.PrinterDC is used to access a printer (Windows only).
–°–Њ–і–µ—А–ґ–∞–љ–Є–µ |
Drawing a simple line
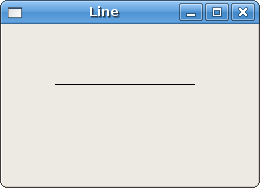
Our first example will draw a simple line onto the client area of a window.
DrawLine(int x1, int y1, int x2, int y2)
This method draws a line from the first point to the second. Excluding the second point.
#!/usr/bin/python
# line1.py

import wx

class Line(wx.Frame):
    def __init__(self, parent, id, title):
        wx.Frame.__init__(self, parent, id, title, size=(250, 150))

        wx.FutureCall(2000, self.DrawLine)

        self.Centre()
        self.Show(True)

    def DrawLine(self):
        dc = wx.ClientDC(self)
        dc.DrawLine(50, 60, 190, 60)


app = wx.App()
Line(None, -1, 'Line')
app.MainLoop()
wx.FutureCall(2000, self.DrawLine)
We call the DrawLine() method after the window has been created. We do it because, when the window is created, it is drawn. All our drawings would be therefore lost. We can start drawing after the window has been created. This is the reason, why we call the wx.FutureCall() method.
 def DrawLine(self):
     dc = wx.ClientDC(self)
     dc.DrawLine(50, 60, 190, 60)
We create a wx.ClientDC device context. The only parameter is the window on which we want to draw. In our case it is self, which is a reference to our wx.Frame widget. We call the DrawLine() method of the device context. This call actually draws a line on our window.
It is very important to understand the following behaviour. If we resize the window, the line will disappear. Why is this happening? Every window is redrawn, if it is resized. It is also redrawn, if it is maximized. The window is also redrawn, if we cover it by another window and uncover afterwards. The window is drawn to it's default state and our line is lost. We have to draw the line each time the window is resized. The solution is the wx.PaintEvent. This event is triggered every time, the window is redrawn. We will draw our line inside a method that will be hooked to the paint event.
The following example shows how it is done.
#!/usr/bin/python
# line2.py

import wx

class Line(wx.Frame):
    def __init__(self, parent, id, title):
        wx.Frame.__init__(self, parent, id, title, size=(250, 150))

        self.Bind(wx.EVT_PAINT, self.OnPaint)

        self.Centre()
        self.Show(True)

    def OnPaint(self, event):
        dc = wx.PaintDC(self)
        dc.DrawLine(50, 60, 190, 60)

app = wx.App()
Line(None, -1, 'Line')
app.MainLoop()
self.Bind(wx.EVT_PAINT, self.OnPaint)
Here we bind the OnPaint method to the wx.PaintEvent event. It means, that each time our window is repainted, we call the OnPaint method. Now the line will not disappear, if we resize our window (cover it, maximize it).
dc = wx.PaintDC(self)
Notice, that this time we have used the wx.PaintDC device context.
2D Vector Graphics
There are two different computer graphics. Vector and raster graphics. Raster graphics represents images as a collection of pixels. Vector graphics is the use of geometrical primitives such as points, lines, curves or polygons to represent images. These primitives are created using mathematical equations.
Both types of computer graphics have advantages and disadvantages. The advantages of vector graphics over raster are:
- smaller size
- ability to zoom indefinitely
- moving, scaling, filling or rotating does not degrade the quality of an image
Types of primitives
- points
- lines
- polylines
- polygons
- circles
- ellipses
- Splines
Device context attributes
| Attribute | Object | Default value | Get Method | Set Method | ||
|---|---|---|---|---|---|---|
| Brush | wx.Brush | wx.WHITE_BRUSH | wx.Brush GetBrush() | SetBrush(wx.Brush brush) | ||
| Pen | wx.Pen | wx.BLACK_PEN | wx.Pen GetPen() | SetPen(wx.Pen pen) | ||
| Mapping Mode | ||||||
| wx.MM_TEXT | int GetMapMode() | SetMapMode(int mode) | ||||
| BackgroundMode | - | wx.TRANSPARENT | int GetBackgroundMode() | SetBackgroundMode(int mode) | ||
| Text background colour | wx.Colour | wx.WHITE | wx.Colour GetTextBackground() | SetTextBackground(wx.Colour colour) | ||
| Text foreground colour | wx.Colour | wx.BLACK | wx.Colour GetTextForeground() | SetTextForeground(wx.Colour colour) | ||
Basic elements
In the following lines we will introduce several elementary objects. Colours, Brushes, Pens, Joins, Caps, Gradients.
Colours
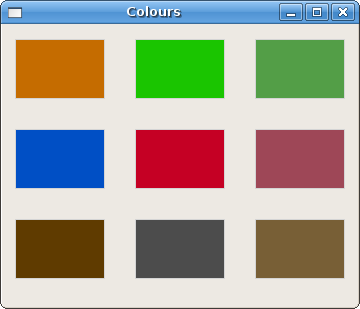
A colour is an object representing a combination of Red, Green, and Blue (RGB) intensity values. Valid RGB values are in the range 0 to 255. There are three ways for setting colours. We can create a wx.Colour object, use a predefined colour name or use hex value string. wx.Colour(0,0,255), 'BLUE', '#0000FF'. These three notations produce the same colour. I prefer the hexadecimal notation. A perfect tool for working with colours can be found on the colorjack.com website. Or we can use such a tool as Gimp.
We have also a list of predefined colour names that we can use in our programs.
| AQUAMARINE | BLACK | BLUE | BLUE VIOLET | BROWN |
| CADET BLUE | CORAL | CORNFLOWER BLUE | CYAN | DARK GREY |
| DARK GREEN | DARK OLIVE GREEN | DARK ORCHID | DARK SLATE BLUE | DARK SLATE GREY |
| DARK TURQUOISE | DIM GREY | FIREBRICK | FOREST GREEN | GOLD |
| GOLDENROD | GREY | GREEN | GREEN YELLOW | INDIAN RED |
| KHAKI | LIGHT BLUE | LIGHT GREY | LIGHT STEEL BLUE | LIME GREEN |
| MAGENTA | MAROON | MEDIUM AQUAMARINE | MEDIUM BLUE | MEDIUM FOREST GREEN |
| MEDIUM GOLDENROD | MEDIUM ORCHID | MEDIUM SEA GREEN | MEDIUM SLATE BLUE | MEDIUM SPRING GREEN |
| MEDIUM TURQUOISE | MEDIUM VIOLET RED | MIDNIGHT BLUE | NAVY | ORANGE |
| ORANGE RED | ORCHID | PALE GREEN | PINK | PLUM |
| PURPLE | RED | SALMON | SEA GREEN | SIENNA |
| SKY BLUE | SLATE BLUE | SPRING GREEN | STEEL BLUE | TAN |
| THISTLE | TURQUOISE | VIOLET | VIOLET RED | WHEAT |
| WHITE | YELLOW | YELLOW GREEN |
#!/usr/bin/python
# colours.py

import wx

class Colours(wx.Frame):
    def __init__(self, parent, id, title):
        wx.Frame.__init__(self, parent, id, title, size=(350, 280))

        self.Bind(wx.EVT_PAINT, self.OnPaint)

        self.Centre()
        self.Show(True)

    def OnPaint(self, event):
        dc = wx.PaintDC(self)
        dc.SetPen(wx.Pen('#d4d4d4'))

        dc.SetBrush(wx.Brush('#c56c00'))
        dc.DrawRectangle(10, 15, 90, 60)

        dc.SetBrush(wx.Brush('#1ac500'))
        dc.DrawRectangle(130, 15, 90, 60)

        dc.SetBrush(wx.Brush('#539e47'))
        dc.DrawRectangle(250, 15, 90, 60)

        dc.SetBrush(wx.Brush('#004fc5'))
        dc.DrawRectangle(10, 105, 90, 60)

        dc.SetBrush(wx.Brush('#c50024'))
        dc.DrawRectangle(130, 105, 90, 60)

        dc.SetBrush(wx.Brush('#9e4757'))
        dc.DrawRectangle(250, 105, 90, 60)

        dc.SetBrush(wx.Brush('#5f3b00'))
        dc.DrawRectangle(10, 195, 90, 60)

        dc.SetBrush(wx.Brush('#4c4c4c'))
        dc.DrawRectangle(130, 195, 90, 60)

        dc.SetBrush(wx.Brush('#785f36'))
        dc.DrawRectangle(250, 195, 90, 60)

app = wx.App()
Colours(None, -1, 'Colours')
app.MainLoop()
wx.Pen
Pen is an elementary graphics object. It is used to draw lines, curves and outlines of rectangles, ellipses, polygons or other shapes.
wx.Pen(wx.Colour colour, widht=1, style=wx.SOLID)
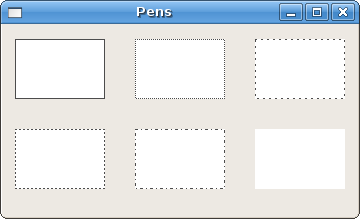
The wx.Pen constructor has three parameters. Colour, width and style. Follows a list of possible pen styles.
Pen styles
- wx.SOLID
- wx.DOT
- wx.LONG_DASH
- wx.SHORT_DASH
- wx.DOT_DASH
- wx.TRANSPARENT
#!/usr/bin/python
# pens.py

import wx

class Pens(wx.Frame):
    def __init__(self, parent, id, title):
        wx.Frame.__init__(self, parent, id, title, size=(350, 190))

        self.Bind(wx.EVT_PAINT, self.OnPaint)

        self.Centre()
        self.Show(True)

    def OnPaint(self, event):
        dc = wx.PaintDC(self)

        dc.SetPen(wx.Pen('#4c4c4c', 1, wx.SOLID))
        dc.DrawRectangle(10, 15, 90, 60)

        dc.SetPen(wx.Pen('#4c4c4c', 1, wx.DOT))
        dc.DrawRectangle(130, 15, 90, 60)

        dc.SetPen(wx.Pen('#4c4c4c', 1, wx.LONG_DASH))
        dc.DrawRectangle(250, 15, 90, 60)

        dc.SetPen(wx.Pen('#4c4c4c', 1, wx.SHORT_DASH))
        dc.DrawRectangle(10, 105, 90, 60)

        dc.SetPen(wx.Pen('#4c4c4c', 1, wx.DOT_DASH))
        dc.DrawRectangle(130, 105, 90, 60)

        dc.SetPen(wx.Pen('#4c4c4c', 1, wx.TRANSPARENT))
        dc.DrawRectangle(250, 105, 90, 60)

app = wx.App()
Pens(None, -1, 'Pens')
app.MainLoop()
If we don't specify a custom brush, a default one is used. The default brush is wx.WHITE_BRUSH. The perimeter of the rectangles is drawn by the pen. The last one has no border. It is transparent, e.g. not visible.
Joins and Caps
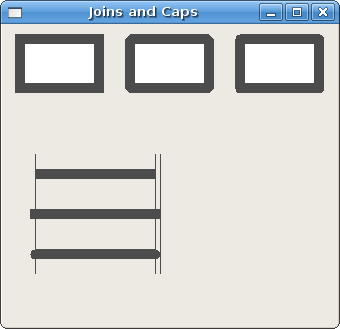
A pen object has additional two parameters. The Join and the Cap. The Join defines how joins between lines will be drawn. The Join style has the following options:
- wx.JOIN_MITER
- wx.JOIN_BEVEL
- wx.JOIN_ROUND
When using wx.JOIN_MITER the outer edges of the lines are extended. They meet at an angle, and this area is filled. In wx.JOIN_BEVEL the triangular notch between two lines is filled. In wx.JOIN_ROUND the circular arc between the two lines is filled. The default value is wx.JOIN_ROUND.
The Cap defines how the line ends will be drawn by the pen. The options are:
- wx.CAP_ROUND
- wx.CAP_PROJECTING
- wx.CAP_BUTT
The wx.CAP_ROUND will draw rounded ends. The wx.CAP_PROJECTING and the wx.CAP_BUTT will both draw square ends. The difference between them is that the wx.CAP_PROJECTING will extend beyond the end point by the half of the line size. The wx.CAP_ROUND will extend beyond the end point as well.
#!/usr/bin/python
# joinscaps.py

import wx

class JoinsCaps(wx.Frame):
    def __init__(self, parent, id, title):
        wx.Frame.__init__(self, parent, id, title, size=(330, 300))

        self.Bind(wx.EVT_PAINT, self.OnPaint)

        self.Centre()
        self.Show(True)

    def OnPaint(self, event):
        dc = wx.PaintDC(self)

        pen = wx.Pen('#4c4c4c', 10, wx.SOLID)

        pen.SetJoin(wx.JOIN_MITER)
        dc.SetPen(pen)
        dc.DrawRectangle(15, 15, 80, 50)

        pen.SetJoin(wx.JOIN_BEVEL)
        dc.SetPen(pen)
        dc.DrawRectangle(125, 15, 80, 50)

        pen.SetJoin(wx.JOIN_ROUND)
        dc.SetPen(pen)
        dc.DrawRectangle(235, 15, 80, 50)

        pen.SetCap(wx.CAP_BUTT)
        dc.SetPen(pen)
        dc.DrawLine(30, 150,  150, 150)

        pen.SetCap(wx.CAP_PROJECTING)
        dc.SetPen(pen)
        dc.DrawLine(30, 190,  150, 190)

        pen.SetCap(wx.CAP_ROUND)
        dc.SetPen(pen)
        dc.DrawLine(30, 230,  150, 230)

        pen2 = wx.Pen('#4c4c4c', 1, wx.SOLID)
        dc.SetPen(pen2)
        dc.DrawLine(30, 130, 30, 250)
        dc.DrawLine(150, 130, 150, 250)
        dc.DrawLine(155, 130, 155, 250)

app = wx.App()
JoinsCaps(None, -1, 'Joins and Caps')
app.MainLoop()
pen = wx.Pen('#4c4c4c', 10, wx.SOLID)
In order to see the various Join and Cap styles, we need to set the pen width to be greater than 1.
 dc.DrawLine(150, 130, 150, 250)
 dc.DrawLine(155, 130, 155, 250)
Notice the two enclosing vertical lines. The distance between them is 5px. It is exactly the half of the current pen width.
Gradients
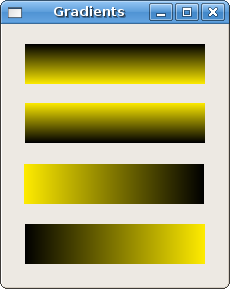
In computer graphics, gradient is a smooth blending of shades from light to dark or from one color to another. In 2D drawing programs and paint programs, gradients are used to create colorful backgrounds and special effects as well as to simulate lights and shadows. (answers.com)
GradientFillLinear(wx.Rect rect, wx.Colour initialColour, wx.Colour destColour, int nDirection=wx.EAST)
This method fills the area specified by a rect with a linear gradient, starting from
initialColour and eventually fading to destColour. The nDirection parameter specifies the direction of the colour change, the default value is wx.EAST.
#!/usr/bin/python
# gradients.py

import wx

class Gradients(wx.Frame):
    def __init__(self, parent, id, title):
        wx.Frame.__init__(self, parent, id, title, size=(220, 260))

        self.Bind(wx.EVT_PAINT, self.OnPaint)

        self.Centre()
        self.Show(True)

    def OnPaint(self, event):
        dc = wx.PaintDC(self)

        dc.GradientFillLinear((20, 20, 180, 40), '#ffec00', '#000000', wx.NORTH)
        dc.GradientFillLinear((20, 80, 180, 40), '#ffec00', '#000000', wx.SOUTH)
        dc.GradientFillLinear((20, 140, 180, 40), '#ffec00', '#000000', wx.EAST)
        dc.GradientFillLinear((20, 200, 180, 40), '#ffec00', '#000000', wx.WEST)


app = wx.App()
Gradients(None, -1, 'Gradients')
app.MainLoop()
wx.Brush
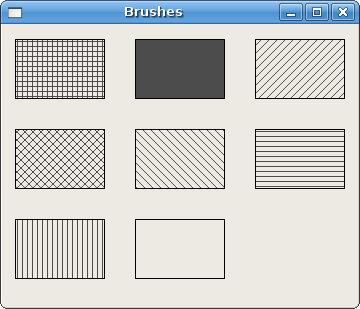
Brush is an elementary graphics object. It is used to paint the background of graphics shapes, such as rectangles, ellipses or polygons.
wx.Brush(wx.Colour colour, style=wx.SOLID)
The constructor of the wx.Brush accepts two parameters. Colour name and style. The following is a list of possible brush styles.
Brush styles
- wx.SOLID
- wx.STIPPLE
- wx.BDIAGONAL_HATCH
- wx.CROSSDIAG_HATCH
- wx.FDIAGONAL_HATCH
- wx.CROSS_HATCH
- wx.HORIZONTAL_HATCH
- wx.VERTICAL_HATCH
- wx.TRANSPARENT
#!/usr/bin/python
# brushes.py

import wx

class Brush(wx.Frame):
    def __init__(self, parent, id, title):
        wx.Frame.__init__(self, parent, id, title, size=(350, 280))

        self.Bind(wx.EVT_PAINT, self.OnPaint)

        self.Centre()
        self.Show(True)

    def OnPaint(self, event):
        dc = wx.PaintDC(self)

        dc.SetBrush(wx.Brush('#4c4c4c', wx.CROSS_HATCH))
        dc.DrawRectangle(10, 15, 90, 60)

        dc.SetBrush(wx.Brush('#4c4c4c', wx.SOLID))
        dc.DrawRectangle(130, 15, 90, 60)

        dc.SetBrush(wx.Brush('#4c4c4c', wx.BDIAGONAL_HATCH))
        dc.DrawRectangle(250, 15, 90, 60)

        dc.SetBrush(wx.Brush('#4c4c4c', wx.CROSSDIAG_HATCH))
        dc.DrawRectangle(10, 105, 90, 60)

        dc.SetBrush(wx.Brush('#4c4c4c', wx.FDIAGONAL_HATCH))
        dc.DrawRectangle(130, 105, 90, 60)

        dc.SetBrush(wx.Brush('#4c4c4c', wx.HORIZONTAL_HATCH))
        dc.DrawRectangle(250, 105, 90, 60)

        dc.SetBrush(wx.Brush('#4c4c4c', wx.VERTICAL_HATCH))
        dc.DrawRectangle(10, 195, 90, 60)

        dc.SetBrush(wx.Brush('#4c4c4c', wx.TRANSPARENT))
        dc.DrawRectangle(130, 195, 90, 60)


app = wx.App()
Brush(None, -1, 'Brushes')
app.MainLoop()
Custom Patterns
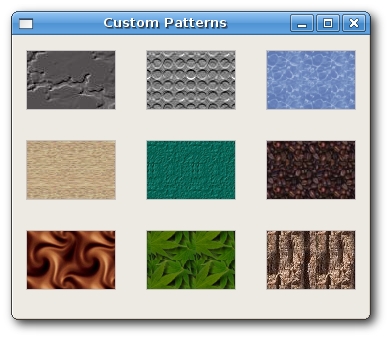
We are not restricted to use predefined patterns. We can easily create our own custom patterns.
wx.Brush BrushFromBitmap(wx.Bitmap stippleBitmap)
This method creates a custom brush from the bitmap.
#!/usr/bin/python
# custompatterns.py

import wx

class CustomPatterns(wx.Frame):
    def __init__(self, parent, id, title):
        wx.Frame.__init__(self, parent, id, title, size=(350, 280))

        self.Bind(wx.EVT_PAINT, self.OnPaint)

        self.Centre()
        self.Show(True)

    def OnPaint(self, event):
        dc = wx.PaintDC(self)

        dc.SetPen(wx.Pen('#C7C3C3'))

        brush1 = wx.BrushFromBitmap(wx.Bitmap('pattern1.png'))
        dc.SetBrush(brush1)
        dc.DrawRectangle(10, 15, 90, 60)

        brush2 = wx.BrushFromBitmap(wx.Bitmap('pattern2.png'))
        dc.SetBrush(brush2)
        dc.DrawRectangle(130, 15, 90, 60)

        brush3 = wx.BrushFromBitmap(wx.Bitmap('pattern3.png'))
        dc.SetBrush(brush3)
        dc.DrawRectangle(250, 15, 90, 60)

        brush4 = wx.BrushFromBitmap(wx.Bitmap('pattern4.png'))
        dc.SetBrush(brush4)
        dc.DrawRectangle(10, 105, 90, 60)

        brush5 = wx.BrushFromBitmap(wx.Bitmap('pattern5.png'))
        dc.SetBrush(brush5)
        dc.DrawRectangle(130, 105, 90, 60)

        brush6 = wx.BrushFromBitmap(wx.Bitmap('pattern6.png'))
        dc.SetBrush(brush6)
        dc.DrawRectangle(250, 105, 90, 60)

        brush7 = wx.BrushFromBitmap(wx.Bitmap('pattern7.png'))
        dc.SetBrush(brush7)
        dc.DrawRectangle(10, 195, 90, 60)

        brush8 = wx.BrushFromBitmap(wx.Bitmap('pattern8.png'))
        dc.SetBrush(brush8)
        dc.DrawRectangle(130, 195, 90, 60)

        brushr9 = wx.BrushFromBitmap(wx.Bitmap('pattern9.png'))
        dc.SetBrush(brushr9)
        dc.DrawRectangle(250, 195, 90, 60)


app = wx.App()
CustomPatterns(None, -1, 'Custom Patterns')
app.MainLoop()
I have created some small bitmaps. For this I used the Gimp. These bitmaps are rectangles, usually around 40-150px.
Basic primitives
Point
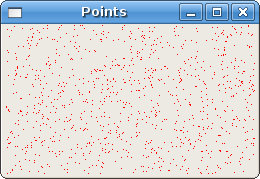
The simplest geometrical object is a point. It is a plain dot on the window.
DrawPoint(int x, int y)
This method draws a point at x, y coordinates.
#!/usr/bin/python
# points.py

import wx
import random

class Points(wx.Frame):
    def __init__(self, parent, id, title):
        wx.Frame.__init__(self, parent, id, title, size=(250, 150))

        self.Bind(wx.EVT_PAINT, self.OnPaint)

        self.Centre()
        self.Show(True)

    def OnPaint(self, event):
        dc = wx.PaintDC(self)

        dc.SetPen(wx.Pen('RED'))

        for i in range(1000):
            w, h = self.GetSize()
            x = random.randint(1, w-1)
            y = random.randint(1, h-1)
            dc.DrawPoint(x, y)


app = wx.App()
Points(None, -1, 'Points')
app.MainLoop()
A single point might be difficult to see. So we create 1000 points.
dc.SetPen(wx.Pen('RED'))
Here we set the colour of the pen to red.
 w, h = self.GetSize()
 x = random.randint(1, w-1)
The points are distributed randomly around the client area of the window. They are also distributed dynamically. If we resize the window, the points will be drawn randomly over a new client size. The randint(a, b) method returns a random integer in range [a, b], e.g. including both points.
Cross Hair
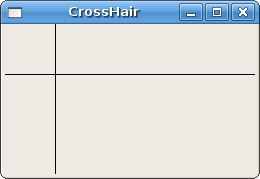
Cross Hair is a vertical and horizontal line the height and width of the window. It is centered on the given point.
CrossHair(int x, int y)
The method draws a cross hair centered on coordinates x, y.
#!/usr/bin/python
# crosshair.py

import wx

class CrossHair(wx.Frame):
    def __init__(self, parent, id, title):
        wx.Frame.__init__(self, parent, id, title, size=(250, 150))

        self.Bind(wx.EVT_PAINT, self.OnPaint)

        self.Centre()
        self.Show(True)

    def OnPaint(self, event):
        dc = wx.PaintDC(self)
        dc.CrossHair(50, 50)


app = wx.App()
CrossHair(None, -1, 'CrossHair')
app.MainLoop()
In the following code example we will create a functionality often seen in games. 'Aiming at the enemy.'
#!/usr/bin/python
# crosshair2.py

import wx

class CrossHair(wx.Frame):
    def __init__(self, parent, id, title):
        wx.Frame.__init__(self, parent, id, title, size=(250, 150))

        self.Bind(wx.EVT_MOTION, self.OnMotion)
        self.Bind(wx.EVT_LEAVE_WINDOW, self.OnLeaveWindow)

        self.SetBackgroundColour('WHITE')
        self.SetCursor(wx.StockCursor(wx.CURSOR_CROSS))
        self.Centre()
        self.Show(True)

    def DrawCrossHair(self, a, b):
        dc = wx.ClientDC(self)
        dc.Clear()
        dc.SetPen(wx.Pen(wx.Colour(100, 100, 100), 1, wx.DOT))
        dc.CrossHair(a, b)

    def OnMotion(self, event):
        x, y = event.GetPosition()
        self.DrawCrossHair(x, y)

    def OnLeaveWindow(self, event):
        dc = wx.ClientDC(self)
        dc.SetBackground(wx.Brush('WHITE'))
        dc.Clear()

app = wx.App()
CrossHair(None, -1, 'CrossHair2')
app.MainLoop()
 self.Bind(wx.EVT_MOTION, self.OnMotion)
 self.Bind(wx.EVT_LEAVE_WINDOW, self.OnLeaveWindow)
We bind two events to event handlers. The wx.EVT_MOTION event is generated, when we move a cursor over the window. The second event wx.EVT_LEAVE_WINDOW is generated, when we leave the window with our mouse cursor.
 def OnMotion(self, event):
     x, y = event.GetPosition()
     self.DrawCrossHair(x, y)
Every time we move a cursor over a window, the method OnMotion() is called. In this method we figure out the current position of the mouse cursor and call the DrawCrossHair method, which is responsible for drawing the cross hair.
    def DrawCrossHair(self, a, b):
     dc = wx.ClientDC(self)
     dc.Clear()
     dc.SetPen(wx.Pen(wx.Colour(100, 100, 100), 1, wx.DOT))
     dc.CrossHair(a, b)
The user defined method DrawCrossHair() draws the cross hair primitive. Notice that to do the drawing, we use the wx.ClientDC device context. Remember that this device context should be used outside the paint event. This script is a perfect example, where we use wx.ClientDC. Not wx.PaintDC. Before we draw a new cross hair drawing, we must clear the old one. This is done with the Clear() method. It does clear the device context area. It uses the default wx.WHITE_BRUSH brush, unless we set a different one. We have set the window cursor to wx.CURSOR_CROSS. In order to actually see it, we have set the pen, which draws the cross hair, to light gray color, 1px wide, dotted.
Chech Mark
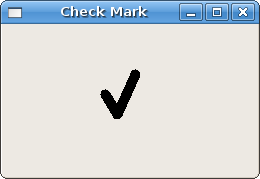
Check Mark is another simple primitive.
DrawCheckMark(int x, int y, int width, int height)
The DrawCheckMark() method draws a check mark on the window at coordinates x, y. It draws the check mark inside the rectangle defined by width and height parameters.
#!/usr/bin/python
# checkmark.py

import wx

class CheckMark(wx.Frame):
    def __init__(self, parent, id, title):
        wx.Frame.__init__(self, parent, id, title, size=(250, 150))

        self.Bind(wx.EVT_PAINT, self.OnPaint)

        self.Centre()
        self.Show(True)

    def OnPaint(self, event):
        dc = wx.PaintDC(self)
        dc.DrawCheckMark(100, 50, 30, 40)


app = wx.App()
CheckMark(None, -1, 'Check Mark')
app.MainLoop()
Shapes
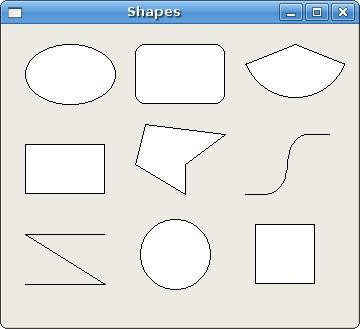
Shapes are more sophisticated geometrical objects. We will draw various geometrical shapes in the following example.
#!/usr/bin/python
# shapes.py

import wx

class Shapes(wx.Frame):
    def __init__(self, parent, id, title):
        wx.Frame.__init__(self, parent, id, title, size=(350, 300))

        self.Bind(wx.EVT_PAINT, self.OnPaint)

        self.Centre()
        self.Show(True)

    def OnPaint(self, event):
        dc = wx.PaintDC(self)

        dc.DrawEllipse(20, 20, 90, 60)
        dc.DrawRoundedRectangle(130, 20, 90, 60, 10)
        dc.DrawArc(240, 40, 340, 40, 290, 20)

        dc.DrawPolygon(((130, 140), (180, 170), (180, 140), (220, 110), (140, 100)))
        dc.DrawRectangle(20, 120, 80, 50)
        dc.DrawSpline(((240, 170), (280, 170), (285, 110), (325, 110)))

        dc.DrawLines(((20, 260), (100, 260), (20, 210), (100, 210)))
        dc.DrawCircle(170, 230, 35)
        dc.DrawRectangle(250, 200, 60, 60)

app = wx.App()
Shapes(None, -1, 'Shapes')
app.MainLoop()
In our example we have drawn an ellipse, a rounded rectangle, an arc, a rectangle ,a polygon, splines, lines, a circle and a square (from right to left, from top to bottom). A circle is a special kind of ellipse and a square is a special kind of rectangle.
Regions
The device context can be divided into several parts called Regions. A region can be of any shape. A region can be a simple rectangle or circle. With Union, Intersect, Substract and Xor operations we can create complex regions from simple ones. Regions are used for outlining, filling or clipping.
We can create regions in three ways. The easiest way is to create a rectangular region. More complex regions can be created from a list of points of from a bitmap.
wx.Region(int x=0, int y=0, int width=0, int height=0)
This constructor creates a rectangular region.
wx.RegionFromPoints(list points, int fillStyle=wx.WINDING_RULE)
This constructor creates a polygonal region. The fillStyle parameter can be wx.WINDING_RULE or wx.ODDEVEN_RULE.
wx.RegionFromBitmap(wx.Bitmap bmp)
The most complex regions can be created with the previous method.
Before we go to the regions, we will create a small example first. We divide the topic into several parts so that it is easier to understand. You may find it a good idea to revise your school math. Here we can find a good article.
#!/usr/bin/python
# lines.py

import wx
from math import hypot, sin, cos, pi

class Lines(wx.Frame):
    def __init__(self, parent, id, title):
        wx.Frame.__init__(self, parent, id, title, size=(450, 400))

        self.Bind(wx.EVT_PAINT, self.OnPaint)

        self.Centre()
        self.Show(True)

    def OnPaint(self, event):
        dc = wx.PaintDC(self)
        size_x, size_y = self.GetClientSizeTuple()
        dc.SetDeviceOrigin(size_x/2, size_y/2)

        radius = hypot(size_x/2, size_y/2)
        angle = 0

        while (angle < 2*pi):
            x = radius*cos(angle)
            y = radius*sin(angle)
            dc.DrawLinePoint((0, 0), (x, y))
            angle = angle + 2*pi/360

app = wx.App()
Lines(None, -1, 'Lines')
app.MainLoop()
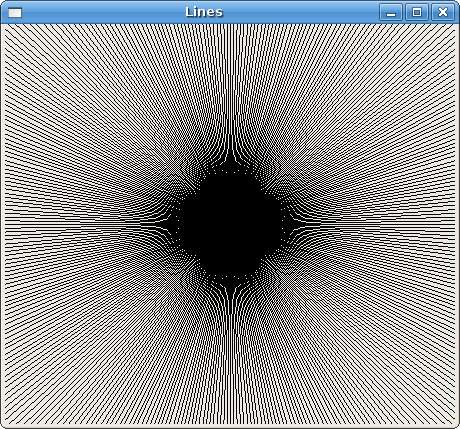
In this example we draw 260 lines from the middle of the client area. The distance between two lines is 1 degree. We create an interesting figure.
 import wx
 from math import hypot, sin, cos, pi
We need three mathematical functions and one constant from the math module.
dc.SetDeviceOrigin(size_x/2, size_y/2)
The method SetDeviceOrigin() creates a new beginning of the coordinate system. We place it into the middle of the client area. By repositioning the coordinate system, we make our drawing less complicated.
radius = hypot(size_x/2, size_y/2)
Here we get the Hypotenuse. It is the longest line, we can draw from the middle of the client area. It is the length of the line, that should be drawn from the beginning into the corner of the window. This way most of the lines are not drawn fully. The overlapping parts are not visible. see Hypotenuse.
 x = radius*cos(angle)
 y = radius*sin(angle)
These are parametric functions. They are used to find [x, y] points on the curve. All 360 lines are drawn from the beginning of the coordinate system up to the points on the circle.
Clipping
Clipping is restricting drawing to a certain area. Clipping is used in two cases. To create effects and to improve performance of the application. We restrict drawing to a certain region with the SetClippingRegionAsRegion() method.
In the following example we will modify and enhance our previous script.
#!/usr/bin/python
# star.py

import wx
from math import hypot, sin, cos, pi

class Star(wx.Frame):
    def __init__(self, parent, id, title):
        wx.Frame.__init__(self, parent, id, title, size=(350, 300))

        self.Bind(wx.EVT_PAINT, self.OnPaint)

        self.Centre()
        self.Show(True)

    def OnPaint(self, event):
        dc = wx.PaintDC(self)

        dc.SetPen(wx.Pen('#424242'))
        size_x, size_y = self.GetClientSizeTuple()
        dc.SetDeviceOrigin(size_x/2, size_y/2)

        points = (((0, 85), (75, 75), (100, 10), (125, 75), (200, 85),
            (150, 125), (160, 190), (100, 150), (40, 190), (50, 125)))

        region = wx.RegionFromPoints(points)
        dc.SetClippingRegionAsRegion(region)

        radius = hypot(size_x/2, size_y/2)
        angle = 0

        while (angle < 2*pi):
            x = radius*cos(angle)
            y = radius*sin(angle)
            dc.DrawLinePoint((0, 0), (x, y))
            angle = angle + 2*pi/360

        dc.DestroyClippingRegion()


app = wx.App()
Star(None, -1, 'Star')
app.MainLoop()
We draw again all the 360 lines. But this time, only a portion of the client aren is drawn. The region that we restrict our drawing to is a star object.
 region = wx.RegionFromPoints(points)
 dc.SetClippingRegionAsRegion(region)
We create a region from the list of points with the wx.RegionFromPoins() method. The SetClippingRegionAsRegion()
method restricts the drawing to the specified region. In our case it is a star object.
dc.DestroyClippingRegion()
We must destroy the clipping region.
Operations over Regions
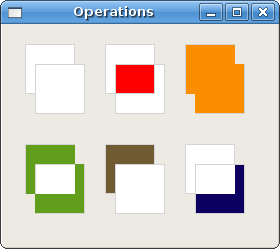
Regions can be combined to create more complex shapes. We can use four set operations. Union, Intersect, Substract and Xor.
The following example shows all four operations in action.
#!/usr/bin/python
# operations.py

import wx

class Operations(wx.Frame):
     def __init__(self, parent, id, title):
         wx.Frame.__init__(self, parent, id, title, size=(270, 220))

         self.Bind(wx.EVT_PAINT, self.OnPaint)

         self.Centre()
         self.Show(True)

     def OnPaint(self, event):
         dc = wx.PaintDC(self)
         dc.SetPen(wx.Pen('#d4d4d4'))

         dc.DrawRectangle(20, 20, 50, 50)
         dc.DrawRectangle(30, 40, 50, 50)

         dc.SetBrush(wx.Brush('#ffffff'))
         dc.DrawRectangle(100, 20, 50, 50)
         dc.DrawRectangle(110, 40, 50, 50)
         region1 = wx.Region(100, 20, 50, 50)
         region2 = wx.Region(110, 40, 50, 50)
         region1.IntersectRegion(region2)
         rect = region1.GetBox()
         dc.SetClippingRegionAsRegion(region1)
         dc.SetBrush(wx.Brush('#ff0000'))
         dc.DrawRectangleRect(rect)
         dc.DestroyClippingRegion()

         dc.SetBrush(wx.Brush('#ffffff'))
         dc.DrawRectangle(180, 20, 50, 50)
         dc.DrawRectangle(190, 40, 50, 50)
         region1 = wx.Region(180, 20, 50, 50)
         region2 = wx.Region(190, 40, 50, 50)
         region1.UnionRegion(region2)
         dc.SetClippingRegionAsRegion(region1)
         rect = region1.GetBox()
         dc.SetBrush(wx.Brush('#fa8e00'))
         dc.DrawRectangleRect(rect)
         dc.DestroyClippingRegion()

         dc.SetBrush(wx.Brush('#ffffff'))
         dc.DrawRectangle(20, 120, 50, 50)
         dc.DrawRectangle(30, 140, 50, 50)
         region1 = wx.Region(20, 120, 50, 50)
         region2 = wx.Region(30, 140, 50, 50)
         region1.XorRegion(region2)
         rect = region1.GetBox()
         dc.SetClippingRegionAsRegion(region1)
         dc.SetBrush(wx.Brush('#619e1b'))
         dc.DrawRectangleRect(rect)
         dc.DestroyClippingRegion()

         dc.SetBrush(wx.Brush('#ffffff'))
         dc.DrawRectangle(100, 120, 50, 50)
         dc.DrawRectangle(110, 140, 50, 50)
         region1 = wx.Region(100, 120, 50, 50)
         region2 = wx.Region(110, 140, 50, 50)
         region1.SubtractRegion(region2)
         rect = region1.GetBox()
         dc.SetClippingRegionAsRegion(region1)
         dc.SetBrush(wx.Brush('#715b33'))
         dc.DrawRectangleRect(rect)
         dc.DestroyClippingRegion()

         dc.SetBrush(wx.Brush('#ffffff'))
         dc.DrawRectangle(180, 120, 50, 50)
         dc.DrawRectangle(190, 140, 50, 50)
         region1 = wx.Region(180, 120, 50, 50)
         region2 = wx.Region(190, 140, 50, 50)
         region2.SubtractRegion(region1)
         rect = region2.GetBox()
         dc.SetClippingRegionAsRegion(region2)
         dc.SetBrush(wx.Brush('#0d0060'))
         dc.DrawRectangleRect(rect)
         dc.DestroyClippingRegion()

app = wx.App()
Operations(None, -1, 'Operations')
app.MainLoop()
Mapping modes
Speak in English, measure in Metric
The English language became the global language for communication. So did the metric system become the global system in measuremet. According to this wikipedia article, there are only three exceptions. The USA, Liberia and Myanmar. For example, Americans use Fahrenheits to measure temperature, gallons to tank their cars or pounds to weigh loads.
This might lead to some funny situations. "It is very hot today. What is the temperature?""Let me see. It is one hundred and ,wait one hundred and ..."?!?!"... five Fahrenheits." "Aha." (When I was in US talking to an American)
Even though we in Europe use the metric system, there are still exceptions. The USA is dominating the IT and we are importing their standards. So we also say that we have a 17 Inch monitor. Graphics can be put into a file, displayed on the screen of a monitor or other device (cameras, videocameras, mobile phones) or printed with a printer. Paper size can be set in millimeters, points or inches, the resolution of a screen is in pixels, the quality of a text is determined by the number of dots per inch. We have also dots, bits or samples. This is one of the reasons we have logical and device units.
Logical and device units
If we draw text or geometrical primitives on the client area, we position them using logical units.

If we want to draw some text, we provide the text parameter and the x, y positions. x, y are in logical units. The device then draws the text in device units. Logical and device units may be the same, or they may differ. Logical units are used by people (millimeters), device units are are native to a particular device. For example a native device unit for a screen is pixel. The native device unit for the HEWLETT PACKARD LaserJet 1022 is 1200 dpi. (dots per inch).
So far we have talked about various measurement units. The mapping mode of the device is a way how to convert logical units to device units. wxPython has the following mapping modes:
| Mapping Mode | Logical Unit |
|---|---|
| wx.MM_TEXT | 1 pixel |
| wx.MM_METRIC | 1 millimeter |
| wx.MM_LOMETRIC | 1/10 of a millimeter |
| wx.MM_POINTS | 1 point, 1/72 of an inch |
| wx.MM_TWIPS | 1/20 of a point or 1/1440 of an inch |
The default mapping mode is wx.MM_TEXT. In this mode, the logical unit is the same as the device unit. When people position object on a screen or design a web page, they think usually in pixels. Web designers create three column pages and these columns are set in pixels. The lowest common denominator for a page is often 800 px etc. This thinking is natural as we know our monitors have e.g. 1024x768 pxs. We are not going to do convertions, rather we are accustomed to think in pixels. If we want to draw a structure in millimeters, we can use the two metric mapping modes. Drawing directly in millimeters is too thick for a screen, that's why we have the wx.MM_LOMETRIC mapping mode.

To set a different mapping mode, we use the SetMapMode() method.
First ruler example
The first ruler example will measure screen objects in pixels.
#!/usr/bin/python
# ruler1.py

import wx


RW = 701 # ruler widht
RM = 10  # ruler margin
RH = 60  # ruler height


class Ruler1(wx.Frame):
    def __init__(self, parent, id, title):
        wx.Frame.__init__(self, parent, id, title, size=(RW + 2*RM, 60),
            style=wx.FRAME_NO_TASKBAR | wx.NO_BORDER | wx.STAY_ON_TOP)
        self.font = wx.Font(7, wx.FONTFAMILY_DEFAULT, wx.FONTSTYLE_NORMAL,
            wx.FONTWEIGHT_BOLD, False, 'Courier 10 Pitch')

        self.Bind(wx.EVT_PAINT, self.OnPaint)
        self.Bind(wx.EVT_LEFT_DOWN, self.OnLeftDown)
        self.Bind(wx.EVT_RIGHT_DOWN, self.OnRightDown)
        self.Bind(wx.EVT_MOTION, self.OnMouseMove)

        self.Centre()
        self.Show(True)

    def OnPaint(self, event):
        dc = wx.PaintDC(self)

        brush = wx.BrushFromBitmap(wx.Bitmap('granite.png'))
        dc.SetBrush(brush)
        dc.DrawRectangle(0, 0, RW+2*RM, RH)
        dc.SetFont(self.font)


        dc.SetPen(wx.Pen('#F8FF25'))
        dc.SetTextForeground('#F8FF25')


        for i in range(RW):
            if not (i % 100):
                dc.DrawLine(i+RM, 0, i+RM, 10)
                w, h = dc.GetTextExtent(str(i))
                dc.DrawText(str(i), i+RM-w/2, 11)
            elif not (i % 20):
                dc.DrawLine(i+RM, 0, i+RM, 8)
            elif not (i % 2): dc.DrawLine(i+RM, 0, i+RM, 4)

    def OnLeftDown(self, event):
        pos = event.GetPosition()
        x, y = self.ClientToScreen(event.GetPosition())
        ox, oy = self.GetPosition()
        dx = x - ox
        dy = y - oy
        self.delta = ((dx, dy))

    def OnMouseMove(self, event):
        if event.Dragging() and event.LeftIsDown():
            x, y = self.ClientToScreen(event.GetPosition())
            fp = (x - self.delta[0], y - self.delta[1])
            self.Move(fp)

    def OnRightDown(self, event):
        self.Close()

app = wx.App()
Ruler1(None, -1, '')
app.MainLoop()
In this example we create a ruler. This ruler will measure screen objects in pixels. We left the default mapping mode, which is wx.MM_TEXT. As we have already mentioned, this mode has the same logical and device units. In our case, pixels.
 wx.Frame.__init__(self, parent, id, title, size=(RW + 2*RM, 60), style=wx.FRAME_NO_TASKBAR |
	wx.NO_BORDER | wx.STAY_ON_TOP)
We have created a borderless window. The ruler is 721 px wide. The ruler is RW + 2*RM = 701 + 20 = 721. The ruler shows 700 numbers. 0 ... 700 is 701 pixels. A ruler has a margin on both sides, 2*10 is 20 pixels. Together it makes 721 pixels.
 brush = wx.BrushFromBitmap(wx.Bitmap('granite.png'))
 dc.SetBrush(brush)
 dc.DrawRectangle(0, 0, RW+2*RM, RH)
Here we draw a custom pattern onto the window. I have used a predefined pattern available in the GIMP. It is called granite.
 w, h = dc.GetTextExtent(str(i))
 dc.DrawText(str(i), i+RM-w/2, 11)
These lines ensure, that we align the text correctly. The GetTextExtent() method returns the width and the height of the text.
We do not have a border around our window. So we must handle moving manually by additional code. The OnLeftDown() and the OnMouseMove() methods enable us to move the ruler. (TODO:link to dragging.)
Practical examples
You might ask yourself, why do we need all those lines, pens, gradients? What is it good for? The following scripts will bring some practical examples. We will utilize, what we have learnt in practice.
Charts
Creating charts is an excelent example of utilizing gdi drawing functions. Charts are not GUI widgets. No gui toolkit provides charts as part of the library. One exception is wxWidgets toolkit (and so the wxPython). But these charts are very simple and cannot be used in real applications. A developer has usually two options. To create his own charting library or use a third-party library.
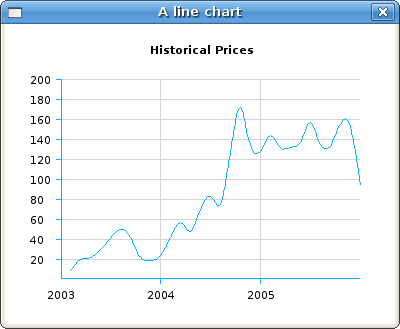
In the following example we create a simple line chart. We do not dwell into all details. I kept the example intentionally simple. A lot of things still remain undone. But you can grasp the idea and follow it.
#!/usr/bin/python
# linechart.py

import wx

data = ((10, 9), (20, 22), (30, 21), (40, 30), (50, 41),
(60, 53), (70, 45), (80, 20), (90, 19), (100, 22),
(110, 42), (120, 62), (130, 43), (140, 71), (150, 89),
(160, 65), (170, 126), (180, 187), (190, 128), (200, 125),
(210, 150), (220, 129), (230, 133), (240, 134), (250, 165),
(260, 132), (270, 130), (280, 159), (290, 163), (300, 94))

years = ('2003', '2004', '2005')


class LineChart(wx.Panel):
    def __init__(self, parent):
        wx.Panel.__init__(self, parent)
        self.SetBackgroundColour('WHITE')

        self.Bind(wx.EVT_PAINT, self.OnPaint)

    def OnPaint(self, event):
        dc = wx.PaintDC(self)
        dc.SetDeviceOrigin(40, 240)
        dc.SetAxisOrientation(True, True)
        dc.SetPen(wx.Pen('WHITE'))
        dc.DrawRectangle(1, 1, 300, 200)
        self.DrawAxis(dc)
        self.DrawGrid(dc)
        self.DrawTitle(dc)
        self.DrawData(dc)

    def DrawAxis(self, dc):
        dc.SetPen(wx.Pen('#0AB1FF'))
        font =  dc.GetFont()
        font.SetPointSize(8)
        dc.SetFont(font)
        dc.DrawLine(1, 1, 300, 1)
        dc.DrawLine(1, 1, 1, 201)

        for i in range(20, 220, 20):
            dc.DrawText(str(i), -30, i+5)
            dc.DrawLine(2, i, -5, i)

        for i in range(100, 300, 100):
            dc.DrawLine(i, 2, i, -5)

        for i in range(3):
            dc.DrawText(years[i], i*100-13, -10)

    def DrawGrid(self, dc):
        dc.SetPen(wx.Pen('#d5d5d5'))

        for i in range(20, 220, 20):
            dc.DrawLine(2, i, 300, i)

        for i in range(100, 300, 100):
            dc.DrawLine(i, 2, i, 200)

    def DrawTitle(self, dc):
        font =  dc.GetFont()
        font.SetWeight(wx.FONTWEIGHT_BOLD)
        dc.SetFont(font)
        dc.DrawText('Historical Prices', 90, 235)


    def DrawData(self, dc):
        dc.SetPen(wx.Pen('#0ab1ff'))
        for i in range(10, 310, 10):
            dc.DrawSpline(data)


class LineChartExample(wx.Frame):
    def __init__(self, parent, id, title):
        wx.Frame.__init__(self, parent, id, title, size=(390, 300))

        panel = wx.Panel(self, -1)
        panel.SetBackgroundColour('WHITE')

        hbox = wx.BoxSizer(wx.HORIZONTAL)
        linechart = LineChart(panel)
        hbox.Add(linechart, 1, wx.EXPAND | wx.ALL, 15)
        panel.SetSizer(hbox)

        self.Centre()
        self.Show(True)


app = wx.App()
LineChartExample(None, -1, 'A line chart')
app.MainLoop()
 dc.SetDeviceOrigin(40, 240)
 dc.SetAxisOrientation(True, True)
By default the coordinate system in wxPython begins at point [0, 0]. The beginning point is located at the upper left corner of the clinet area. The orientation of x values is from left to right and the orientation of y values is from top to bottom. The values can be only positive. This system is used in all GUI toolkits. (All I am aware of.)
For charting we use cartesian coordinate system. In cartesian system, we can have both positive and negative values. The orientation of the x values is from left to right and the orientation of y values is from bottom to top. The origin is usually in the middle. But it is not compulsory.
 dc.SetDeviceOrigin(40, 240)
 dc.SetAxisOrientation(True, True)
The SetDeviceOrigin() method moves the origin to a new point on the client area. This is called linear translation. Then we change the axis orientation with the SetAxisOrientation() method.
SetAxisOrientation(bool xLeftRight, bool yBottomUp)
The method signature is self-explanatory. We can put true or false values to these two parameters.
 self.DrawAxis(dc)
 self.DrawGrid(dc)
 self.DrawTitle(dc)
 self.DrawData(dc)
We separate the construction of the chart into four methods. The first will draw axis, the second will draw the grid, the third the title and the last one will draw the data.
 for i in range(3):
     dc.DrawText(years[i], i*100-13, -10)
Because of the simplicity of the script, there are some magic numbers. In reality, we would have to calculate them. In the previous code example, we draw the years alongside the x axis. We subtract 13 px from the x value. This is done to center the years over the vertical lines. It works on my linux box. I might not work correctly on other platforms. It might not work even on linux boxes with different themes. You just play a bit with this example. Adjusting it to fit under the different circumstances is no rocket science. Normally, we need to calculate the width of the chart, the width of the text and center the text manually.
Note
Note is a small script that shows several interesting features of the GDI. We will see, how we can create a custom shaped window. There are small applications that are used to take visible notes. They work as reminders for people, that work with computers a lot. (e.g. us).
#!/usr/bin/python
# note.py

import wx

class Note(wx.Frame):
    def __init__(self, parent, id, title):
        wx.Frame.__init__(self, parent, id, title,
                        style=wx.FRAME_SHAPED |
                        wx.SIMPLE_BORDER |
                        wx.FRAME_NO_TASKBAR)

        self.font = wx.Font(11, wx.FONTFAMILY_DEFAULT, wx.FONTSTYLE_NORMAL,
		wx.FONTWEIGHT_BOLD, False, 'Comic Sans MS')
        self.bitmap = wx.Bitmap('note.png', wx.BITMAP_TYPE_PNG)
        self.cross = wx.Bitmap('cross.png', wx.BITMAP_TYPE_PNG)

        w = self.bitmap.GetWidth()
        h = self.bitmap.GetHeight()
        self.SetClientSize((w, h))

        if wx.Platform == '__WXGTK__':
            self.Bind(wx.EVT_WINDOW_CREATE, self.SetNoteShape)
        else: self.SetNoteShape()

        self.Bind(wx.EVT_PAINT, self.OnPaint)
        self.Bind(wx.EVT_LEFT_DOWN, self.OnLeftDown)
        self.Bind(wx.EVT_MOTION, self.OnMouseMove)

        self.bitmapRegion = wx.RegionFromBitmap(self.bitmap)
        self.crossRegion = wx.RegionFromBitmap(self.cross)

        self.bitmapRegion.IntersectRegion(self.crossRegion)
        self.bitmapRegion.Offset(170, 10)

        dc = wx.ClientDC(self)
        dc.DrawBitmap(self.bitmap, 0, 0, True)
        self.PositionTopRight()
        self.Show(True)

    def PositionTopRight(self):
        disx, disy = wx.GetDisplaySize()
        x, y = self.GetSize()
        self.Move((disx-x, 0))

    def SetNoteShape(self, *event):
        region = wx.RegionFromBitmap(self.bitmap)
        self.SetShape(region)

    def OnLeftDown(self, event):
        pos = event.GetPosition()
        if self.bitmapRegion.ContainsPoint(pos):
            self.Close()
        x, y = self.ClientToScreen(event.GetPosition())
        ox, oy = self.GetPosition()
        dx = x - ox
        dy = y - oy
        self.delta = ((dx, dy))


    def OnMouseMove(self, event):
        if event.Dragging() and event.LeftIsDown():
            x, y = self.ClientToScreen(event.GetPosition())
            fp = (x - self.delta[0], y - self.delta[1])
            self.Move(fp)

    def OnPaint(self, event):
        dc = wx.PaintDC(self)
        dc.SetFont(self.font)
        dc.SetTextForeground('WHITE')

        dc.DrawBitmap(self.bitmap, 0, 0, True)
        dc.DrawBitmap(self.cross, 170, 10, True)
        dc.DrawText('- Go shopping', 20, 20)
        dc.DrawText('- Make a phone call', 20, 50)
        dc.DrawText('- Write an email', 20, 80)


app = wx.App()
Note(None, -1, '')
app.MainLoop()
The idea behind creating a shaped window is simple. Most applications are rectangular. They share lots of similarities. They have menus, toolbars, titles etc. This might be boring. Some developers create more fancy applications. We can make our applications more attractive by using images. The idea is as follows. We create a frame without a border. We can draw a custom image on the frame during the paint event.
 wx.Frame.__init__(self, parent, id, title,
 		 style=wx.FRAME_SHAPED |
 		 wx.SIMPLE_BORDER |
        	 wx.FRAME_NO_TASKBAR)
In order to create a custom shaped application, we must set necessary style options. The wx.FRAME_SHAPED enables to create a shaped window. The wx.SIMPLE_BORDER removes the thick border. The wx.FRAME_NO_TASKBAR prevents the application from appearing on the taskbar.
 self.font = wx.Font(11, wx.FONTFAMILY_DEFAULT, wx.FONTSTYLE_NORMAL,
		wx.FONTWEIGHT_BOLD, False, 'Comic Sans MS')
I was looking for a nice font for the note example. I finally chose Comic Sans MS. This is a proprietary font. Linux users must install msttcorefonts package. If we do not have a font installed, the system chooses another one. Usually not to our taste.
 self.bitmap = wx.Bitmap('note.png', wx.BITMAP_TYPE_PNG)
 self.cross = wx.Bitmap('cross.png', wx.BITMAP_TYPE_PNG)
I have created two bitmaps. The first is a rounded rectangle. With a kind of an orange fill. I have used Inkscape vector illustrator to create it. The second one is a small cross. It is used to close the application. For this I used Gimp image editor.
 w = self.bitmap.GetWidth()
 h = self.bitmap.GetHeight()
 self.SetClientSize((w, h))
We are going to draw a bitmap on the frame. I order to cover the whole frame, we figure out the bitmap size. Then we set the site of the frame to the size of the bitmap.
 if wx.Platform == '__WXGTK__':
     self.Bind(wx.EVT_WINDOW_CREATE, self.SetNoteShape)
 else: self.SetNoteShape()
This is some platform dependent code. Linux developers should call the SetNoteShape() method immediately after the wx.WindowCreateEvent event.
 dc = wx.ClientDC(self)
 dc.DrawBitmap(self.bitmap, 0, 0, True)
These lines are not necessary, because a paint event is generated during the creation of the application. But we believe, it makes the example smoother. I say we, because this is what I have learnt from the others.
 def SetNoteShape(self, *event):
     region = wx.RegionFromBitmap(self.bitmap)
     self.SetShape(region)
Here we set the shape of the frame to that of the bitmap. The pixels outside the image become transparent.
If we remove a border from the frame, we cannot move the window. The OnLeftDown() and the OnMouseMove() methods enable the user to move the window by clicking on the client area of the frame and dragging it.
 dc.DrawBitmap(self.bitmap, 0, 0, True)
 dc.DrawBitmap(self.cross, 170, 10, True)
 dc.DrawText('- Go shopping', 20, 20)
 dc.DrawText('- Make a phone call', 20, 50)
 dc.DrawText('- Write an email', 20, 80)
Within the OnPaint() method we draw two bitmaps and three texts.
Finally we will talk about how we close the note script.
 self.bitmapRegion = wx.RegionFromBitmap(self.bitmap)
 self.crossRegion = wx.RegionFromBitmap(self.cross)

 self.bitmapRegion.IntersectRegion(self.crossRegion)
 self.bitmapRegion.Offset(170, 10)
 ...
 pos = event.GetPosition()
 if self.bitmapRegion.ContainsPoint(pos):
     self.Close()
We create two regions from two bitmaps. We intersect these two regions. This way we get all pixels that share both bitmaps. Finally we move the region to the point, where we draw the cross bitmap. We use the Offset() method. By default the region starts at [0, 0] point.
Inside the OnLeftDown() method we check if we clicked inside the region. If true, we close the script.
