Java Swing –Ь–µ–љ—О –Є –њ–∞–љ–µ–ї–Є –Є–љ—Б—В—А—Г–Љ–µ–љ—В–Њ–≤
–Ь–∞—В–µ—А–Є–∞–ї –Є–Ј Wiki.crossplatform.ru
–°–Њ–і–µ—А–ґ–∞–љ–Є–µ |
–°–Њ–Ј–і–∞–µ–Љ menubar
Menubar —Н—В–Њ –Њ–і–љ–∞ –Є–Ј –Љ–љ–Њ–≥–Є—Е —Б–Њ—Б—В–∞–≤–ї—П—О—Й–Є—Е –Ї–∞—И–µ—А–љ–Њ–≥–Њ –њ—А–Є–ї–Њ–ґ–µ–љ–Є—П —Б GUI, —Е–Њ—В—П –ї—О–і–Є, –њ—А–Є–і—Г–Љ–∞–≤—И–Є–µ —Б–ї–Њ–≤–Њ "–Ї–∞—И–µ—А–љ—Л–є" –Љ–Њ–≥—Г—В —Б–Њ –Љ–љ–Њ–є –љ–µ —Б–Њ–≥–ї–∞—Б–Є—В—М—Б—П. –°—А–∞–Ј—Г –ґ–µ –њ—А–Є–љ–Њ—И—Г –Є–Љ —Б–≤–Њ–Є –Є–Ј–Љ–µ–љ–µ–љ–Є—П. –І—В–Њ –ґ–µ –і–Њ menubar, —Б–Є–µ –µ—Б—В—М —Б–≥—А—Г–њ–Є—А–Њ–≤–∞–љ–љ—Л–є –љ–∞–±–Њ—А –Ї–Њ–Љ–∞–љ–і. –Т —В–Њ –≤—А–µ–Љ—П –Ї–∞–Ї –њ—А–Є –Є—Б–њ–Њ–ї—М–Ј–Њ–≤–∞–љ–Є–Є –Ї–Њ–љ—Б–Њ–ї—М–љ–Њ–≥–Њ –њ—А–Є–ї–Њ–ґ–µ–љ–Є—П –≤—Л –і–Њ–ї–ґ–љ—Л –±—Л–ї–Є –Ј–∞–њ–Њ–Љ–Є–љ–∞—В—М –≤—Б–µ —Н—В–Є –Ј–∞–≥–∞–і–Њ—З–љ—Л–µ –Ї–Њ–Љ–∞–љ–і—Л (—Б—В—А–∞–љ–љ–Њ, –∞ —П –і—Г–Љ–∞–ї, —З—В–Њ –Ј–∞–≥–∞–і–Њ—З–љ—Л–Љ –ї–Є–љ—Г–Ї—Б–Њ–Є–і–∞–Љ –љ—А–∞–≤–Є—В—Б—П –Ј–∞–њ–Њ–Љ–Є–љ–∞—В—М –Ј–∞–≥–∞–і–Њ—З–љ—Л–µ –Ї–Њ–Љ–∞–љ–і—Л –Є –Њ—В —Н—В–Њ–≥–Њ —Б—В–∞–љ–Њ–≤–Є—В—М—Б—П –µ—Й–µ –±–Њ–ї–µ–µ –Ј–∞–≥–∞–і–Њ—З–љ—Л–Љ–Є - –њ—А–Є–Љ. –њ–µ—А–µ–≤–Њ–і—З–Є–Ї–∞), –Ј–і–µ—Б—М –Љ—Л –Є–Љ–µ–µ–Љ –Љ–љ–Њ–ґ–µ—Б—В–≤–Њ –Ї–Њ–Љ–∞–љ–і –ї–Њ–≥–Є—З–љ–Њ —Б–≥—А—Г–њ–Є—А–Њ–≤–∞–љ–љ—Л—Е –≤ –Њ–і–љ–Њ–Љ –Љ–µ—Б—В–µ –њ–Њ –Ї–∞—В–µ–≥–Њ—А–Є—П–Љ. –Т—Б–µ —Н—В–Њ –њ–Њ–Ј–≤–Њ–ї—П–µ—В —Б—Г—Й–µ—Б—В–≤–µ–љ–љ–Њ —Г–Љ–µ–љ—М—И–Є—В—М –≤—А–µ–Љ–µ–љ–љ—Л–µ –Ј–∞—В—А–∞—В—Л –љ–∞ –Њ—Б–≤–Њ–µ–љ–Є–µ –љ–Њ–≤–Њ–≥–Њ, –љ–µ–Ј–љ–∞–Ї–Њ–Љ–Њ–≥–Њ —А–∞–љ–µ–µ, –њ—А–Є–ї–Њ–ґ–µ–љ–Є—П –њ–Њ–ї—М–Ј–Њ–≤–∞—В–µ–ї–µ–Љ. –Т Java Swing –і–ї—П —А–µ–∞–ї–Є–Ј–∞—Ж–Є–Є menubar –Є—Б–њ–Њ–ї—М–Ј—Г—О—В—Б—П —В—А–Є –Ї–Њ–Љ–њ–Њ–љ–µ–љ—В–∞. –Ш–Љ—П –Є–Љ JMenuBar, JMenu –Є JMenuItem. –Э–Є–ґ–µ –≤—Л –Њ—Й—Г—В–Є—В–µ –Є—Е —Г–ґ–∞—Б–∞—О—Й—Г—О –Љ–Њ—Й—М, —Б–Є–ї—М–љ–µ–µ –Ї–Њ—В–Њ—А–Њ–є –ї–Є—И—М –Ј–∞–≥–∞–і–Њ—З–љ–Њ—Б—В—М –Ї–Њ–љ—Б–Њ–ї–Є.
–Я—А–Њ—Б—В–Њ–є menubar
–Ш—В–∞–Ї, –љ–∞—З–љ–µ–Љ —Б –њ—А–Њ—Б—В–Њ–≥–Њ –њ—А–Є–Љ–µ—А–∞ menubar.
import java.awt.event.ActionEvent;
import java.awt.event.ActionListener;
import java.awt.event.KeyEvent;

import javax.swing.ImageIcon;
import javax.swing.JFrame;
import javax.swing.JMenu;
import javax.swing.JMenuBar;
import javax.swing.JMenuItem;
import javax.swing.UIManager;


public class Menu extends JFrame {

    public Menu() {

        setTitle("JMenuBar");

        JMenuBar menubar = new JMenuBar();
        ImageIcon icon = new ImageIcon("exit.png");

        JMenu file = new JMenu("File");
        file.setMnemonic(KeyEvent.VK_F);

        JMenuItem fileClose = new JMenuItem("Close", icon);
        fileClose.setMnemonic(KeyEvent.VK_C);
        fileClose.setToolTipText("Exit application");
        fileClose.addActionListener(new ActionListener() {
            public void actionPerformed(ActionEvent event) {
                System.exit(0);

        });

        file.add(fileClose);

        menubar.add(file);

        setJMenuBar(menubar);

        setSize(250, 200);
        setLocationRelativeTo(null);
        setDefaultCloseOperation(EXIT_ON_CLOSE);
        setVisible(true);
    }

    public static void main(String[] args) {

        new Menu();

    }
}
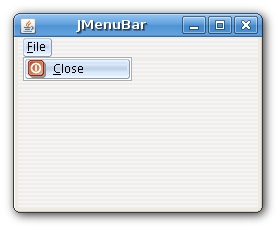
–Э–∞—И –њ—А–Є–Љ–µ—А –і–µ–Љ–Њ–љ—Б—В—А–Є—А—Г–µ—В menubar —Б –Њ–і–љ–Є–Љ —Н–ї–µ–Љ–µ–љ—В–Њ–Љ. –Т—Л–±—А–∞–≤ —Н–ї–µ–Љ–µ–љ—В "Close" –Љ—Л –Ј–∞–Ї—А–Њ–µ–Љ –њ—А–Є–ї–Њ–ґ–µ–љ–Є–µ (–Ј–∞–≤–µ—А—И–Є–Љ –µ–≥–Њ —А–∞–±–Њ—В—Г).
JMenuBar menubar = new JMenuBar();
–Ч–і–µ—Б—М –Љ—Л —Б–Њ–Ј–і–∞–µ–Љ menubar.
ImageIcon icon = new ImageIcon("exit.png");
–Ю—В–Њ–±—А–∞–Ј–Є–Љ –Є–Ї–Њ–љ–Ї—Г –≤ –Љ–µ–љ—О.
 JMenu file = new JMenu("File");
 file.setMnemonic(KeyEvent.VK_F);
–°–Њ–Ј–і–∞–і–Є–Љ –Њ–±—К–µ–Ї—В –Љ–µ–љ—О. –Ь–Њ–ґ–љ–Њ —В–∞–Ї–ґ–µ –±—Л—Б—В—А–Њ –њ–Њ–ї—Г—З–Є—В—М –і–Њ—Б—В—Г–њ –Ї –њ—Г–љ–Ї—В–∞–Љ –Љ–µ–љ—О –њ–Њ—Б—А–µ–і—Б—В–≤–Њ–Љ –Ї–ї–∞–≤–Є–∞—В—Г—А—Л. –Ф–ї—П –љ–∞–Ј–љ–∞—З–µ–љ–Є—П —Н–ї–µ–Љ–µ–љ—В—Г –Љ–µ–љ—О —Б–њ–µ—Ж–Є–∞–ї—М–љ–Њ–є –Ї–ї–∞–≤–Є—И–Є, –Љ—Л –Є—Б–њ–Њ–ї—М–Ј—Г–µ–Љ –Љ–µ—В–Њ–і setMnemonic. –Т –љ–∞—И–µ–Љ —Б–ї—Г—З–∞–µ, –Љ–µ–љ—О –Љ–Њ–ґ–µ—В –±—Л—В—М –Њ—В–Ї—А—Л—В–Њ —Б –њ–Њ–Љ–Њ—Й—М—О —Б–Њ—З–µ—В–∞–љ–Є—П –Ї–ї–∞–≤–Є—И ALT + F.
fileClose.setToolTipText("Exit application");
–Т —Н—В–Њ–є —Б—В—А–Њ–Ї–µ –Љ—Л —Б–Њ–Ј–і–∞–µ–Љ –≤—Б–њ–ї—Л–≤–∞—О—Й—Г—О –њ–Њ–і—Б–Ї–∞–Ј–Ї—Г –і–ї—П —Н–ї–µ–Љ–µ–љ—В–∞ –Љ–µ–љ—О.
Submenu (–њ–Њ–і–њ—Г–љ–Ї—В—Л –Љ–µ–љ—О)
–Ъ–∞–ґ–і–Њ–µ –Љ–µ–љ—О –Љ–Њ–ґ–µ—В –Є–Љ–µ—В—М –њ—А–Њ–Є–Ј–≤–Њ–ї—М–љ–Њ–µ –Ї–Њ–ї–Є—З–µ—Б—В–≤–Њ —Б—Г–±–Љ–µ–љ—О. –Ґ–∞–Ї–Є–Љ –Њ–±—А–∞–Ј–Њ–Љ –Љ—Л –Љ–Њ–ґ–µ–Љ –Њ–±—К–µ–і–µ–љ—П—В—М —Б—Е–Њ–ґ–Є–µ –њ–Њ —Б–Љ—Л—Б–ї—Г –Ї–Њ–Љ–∞–љ–і—Л –≤ –≥—А—Г–њ–њ—Л. –Э–∞–њ—А–Є–Љ–µ—А, –Љ—Л –Љ–Њ–ґ–µ–Љ –њ–Њ–Љ–µ—Б—В–Є—В—М –Ї–Њ–Љ–∞–љ–і—Л, –Ї–Њ—В–Њ—А—Л–µ —Б–Ї—А—Л–≤–∞—О—В/–њ–Њ–Ї–∞–Ј—Л–≤–∞—О—В —А–∞–Ј–ї–Є—З–љ—Л–µ toolbars like personal bar, address bar, status bar or navigation bar into a submenu called toolbars. Within a menu, we can seperate commands with a separator. It is a simple line. It is common practice to separate commands like new, open, save from commands like print, print preview with a single separator. Menus commands can be launched via keyboard shortcuts. For this, we define menu item accelerators.
import java.awt.event.ActionEvent;
import java.awt.event.ActionListener;
import java.awt.event.KeyEvent;

import javax.swing.ImageIcon;
import javax.swing.JFrame;
import javax.swing.JMenu;
import javax.swing.JMenuBar;
import javax.swing.JMenuItem;
import javax.swing.KeyStroke;


public class Submenu extends JFrame {

    public Submenu() {

        setTitle("Submenu");

        JMenuBar menubar = new JMenuBar();
        ImageIcon iconNew = new ImageIcon("new.png");
        ImageIcon iconOpen = new ImageIcon("open.png");
        ImageIcon iconSave = new ImageIcon("save.png");
        ImageIcon iconClose = new ImageIcon("exit.png");

        JMenu file = new JMenu("File");
        file.setMnemonic(KeyEvent.VK_F);

        JMenu imp = new JMenu("Import");
        imp.setMnemonic(KeyEvent.VK_M);

        JMenuItem newsf = new JMenuItem("Import newsfeed list...");
        JMenuItem bookm = new JMenuItem("Import bookmarks...");
        JMenuItem mail = new JMenuItem("Import mail...");

        imp.add(newsf);
        imp.add(bookm);
        imp.add(mail);

        JMenuItem fileNew = new JMenuItem("New", iconNew);
        fileNew.setMnemonic(KeyEvent.VK_N);

        JMenuItem fileOpen = new JMenuItem("Open", iconOpen);
        fileNew.setMnemonic(KeyEvent.VK_O);

        JMenuItem fileSave = new JMenuItem("Save", iconSave);
        fileSave.setMnemonic(KeyEvent.VK_S);

        JMenuItem fileClose = new JMenuItem("Close", iconClose);
        fileClose.setMnemonic(KeyEvent.VK_C);
        fileClose.setToolTipText("Exit application");
        fileClose.setAccelerator(KeyStroke.getKeyStroke(KeyEvent.VK_W,
            ActionEvent.CTRL_MASK));

        fileClose.addActionListener(new ActionListener() {
            public void actionPerformed(ActionEvent event) {
                System.exit(0);
            }

        });

        file.add(fileNew);
        file.add(fileOpen);
        file.add(fileSave);
        file.addSeparator();
        file.add(imp);
        file.addSeparator();
        file.add(fileClose);

        menubar.add(file);

        setJMenuBar(menubar);

        setSize(360, 250);
        setLocationRelativeTo(null);
        setDefaultCloseOperation(EXIT_ON_CLOSE);
        setVisible(true);
    }

    public static void main(String[] args) {
        new Submenu();
    }
}
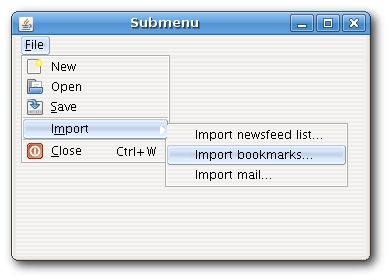
In this example, we create a submenu, a menu separator and an accelerator key.
 JMenu imp = new JMenu("Import");
 ...
 file.add(imp);
A submenu is just like any other normal menu. It is created the same way. We simply add a menu to existing menu.
 fileClose.setAccelerator(KeyStroke.getKeyStroke(KeyEvent.VK_W,
     ActionEvent.CTRL_MASK));
An accelerator is a key shortcut that launches a menu item. In our case, by pressing Ctrl + W we close the application.
file.addSeparator();
A separator is a vertical line that visually separates the menu items. This way we can group items into some logical places.
JCheckBoxMenuItem
A menu item that can be selected or deselected. If selected, the menu item typically appears with a checkmark next to it. If unselected or deselected, the menu item appears without a checkmark. Like a regular menu item, a check box menu item can have either text or a graphic icon associated with it, or both.
import java.awt.BorderLayout;
import java.awt.event.ActionEvent;
import java.awt.event.ActionListener;
import java.awt.event.KeyEvent;

import javax.swing.BorderFactory;
import javax.swing.JCheckBoxMenuItem;
import javax.swing.JFrame;
import javax.swing.JLabel;
import javax.swing.JMenu;
import javax.swing.JMenuBar;
import javax.swing.UIManager;
import javax.swing.border.EtchedBorder;


public class CheckMenuItem extends JFrame {


    private JLabel statusbar;

    public CheckMenuItem() {

        setTitle("CheckBoxMenuItem");

        JMenuBar menubar = new JMenuBar();
        JMenu file = new JMenu("File");
        file.setMnemonic(KeyEvent.VK_F);

        JMenu view = new JMenu("View");
        view.setMnemonic(KeyEvent.VK_V);

        JCheckBoxMenuItem sbar = new JCheckBoxMenuItem("Show StatuBar");
        sbar.setState(true);

        sbar.addActionListener(new ActionListener() {
            public void actionPerformed(ActionEvent event) {
                if (statusbar.isVisible()) {
                    statusbar.setVisible(false);
                } else {
                    statusbar.setVisible(true);
                }
            }

        });

        view.add(sbar);

        menubar.add(file);
        menubar.add(view);

        setJMenuBar(menubar);

        statusbar = new JLabel(" Statusbar");
        statusbar.setBorder(BorderFactory.createEtchedBorder(
		EtchedBorder.RAISED));
        add(statusbar, BorderLayout.SOUTH);


        setSize(360, 250);
        setLocationRelativeTo(null);
        setDefaultCloseOperation(EXIT_ON_CLOSE);
        setVisible(true);
    }

    public static void main(String[] args) {
        new CheckMenuItem();
    }
}
The example shows a JCheckBoxMenuItem.. By selecting the menu item, we toggle the visibility of the statusbar.
 JCheckBoxMenuItem sbar = new JCheckBoxMenuItem("Show StatuBar");
 sbar.setState(true);
We create the JCheckBoxMenuItem and check it by default. The statusbar is initially visible.
 if (statusbar.isVisible()) {
	 statusbar.setVisible(false);
 } else {
	 statusbar.setVisible(true);
 }
Here we toggle the visibility of the statusbar.
 statusbar = new JLabel(" Statusbar");
 statusbar.setBorder(BorderFactory.createEtchedBorder(EtchedBorder.RAISED));
The statusbar is a simple JLabel component. We put a raised EtchedBorder around the label, so that it is discernible.
A popup menu
Another type of a menu is a popup menu. It is sometimes called a context menu. It is usually shown, when we right click on a component. The idea is to provide only the commands, that are relevant to the current context. Say we have an image. By right clicking on the image, we get a window with commands to save, rescale, move etc the image.
import java.awt.Toolkit;

import javax.swing.*;
import java.awt.event.*;

public class PopupMenu {

    private JPopupMenu menu;
    private Toolkit toolkit;

  public PopupMenu(){


    JFrame frame = new JFrame("JPopupMenu");
    frame.setDefaultCloseOperation(JFrame.EXIT_ON_CLOSE);

    toolkit = frame.getToolkit();

    menu = new JPopupMenu();
    JMenuItem menuItemBeep = new JMenuItem("Beep");

    menuItemBeep.addActionListener(new ActionListener() {
        public void actionPerformed(ActionEvent e) {
            toolkit.beep();
        }
    });

    menu.add(menuItemBeep);

    JMenuItem menuItemClose = new JMenuItem("Close");
    menuItemClose.addActionListener(new ActionListener() {
        public void actionPerformed(ActionEvent e) {
            System.exit(0);
        }

    });

    menu.add(menuItemClose);

    frame.addMouseListener(new MouseAdapter() {
        public void mouseReleased(MouseEvent e) {
            if (e.getButton() == e.BUTTON3) {
                menu.show(e.getComponent(), e.getX(), e.getY());
            }
        }
    });

    frame.setSize(250, 200);
    frame.setLocationRelativeTo(null);
    frame.setVisible(true);
  }


  public static void main(String[] args) {
        new PopupMenu();
  }
}
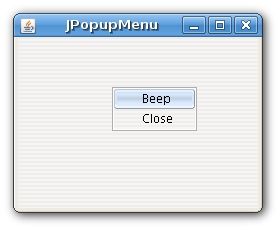
Our example shows a demonstrational popup menu with two commands. The first option of the popup menu will beep a sound, the second one will close the window.
In our example, we create a submenu, menu separators and create an accelerator key.
menu = new JPopupMenu();
To create a popup menu, we have a class called JPopupMenu.
JMenuItem menuItemBeep = new JMenuItem("Beep");
The menu item is the same, as with the standard JMenu
 frame.addMouseListener(new MouseAdapter() {
     public void mouseReleased(MouseEvent e) {
         if (e.getButton() == e.BUTTON3) {
             menu.show(e.getComponent(), e.getX(), e.getY());
         }
     }
 });
The popup menu is shown, where we clicked with the mouse button. The BUTTON3 constant is here to enable the popup menu only for the mouse right click.
JToolbar
Menus group commands that we can use in an application. Toolbars provide a quick access to the most frequently used commands. In Java Swing, the JToolBar class creates a toolbar in an application.
import java.awt.BorderLayout;
import java.awt.event.ActionEvent;
import java.awt.event.ActionListener;

import javax.swing.ImageIcon;
import javax.swing.JButton;
import javax.swing.JFrame;
import javax.swing.JMenu;
import javax.swing.JMenuBar;
import javax.swing.JToolBar;


public class SimpleToolbar extends JFrame {


    public SimpleToolbar() {

        setTitle("SimpleToolbar");

        JMenuBar menubar = new JMenuBar();
        JMenu file = new JMenu("File");
        menubar.add(file);
        setJMenuBar(menubar);

        JToolBar toolbar = new JToolBar();

        ImageIcon icon = new ImageIcon(getClass().getResource("exit.png"));

        JButton exit = new JButton(icon);
        toolbar.add(exit);
        exit.addActionListener(new ActionListener() {
            public void actionPerformed(ActionEvent event) {
                System.exit(0);
            }

        });


        add(toolbar, BorderLayout.NORTH);

        setSize(300, 200);
        setLocationRelativeTo(null);
        setDefaultCloseOperation(EXIT_ON_CLOSE);
        setVisible(true);
    }

    public static void main(String[] args) {
        new SimpleToolbar();
    }
}
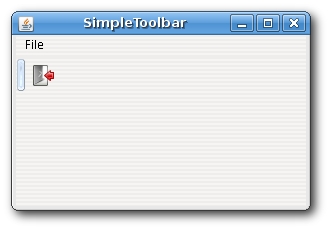
The example creates a toolbar with one exit button.
JToolBar toolbar = new JToolBar();
This is the JToolBar constructor.
 JButton exit = new JButton(icon);
 toolbar.add(exit);
We create a button and add it to the toolbar.
Toolbars
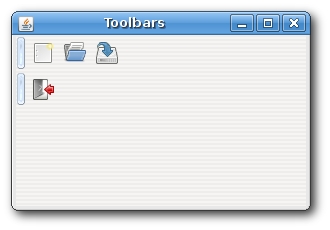
Say, we wanted to create two toolbars. The next example shows, how we could do it.
import java.awt.BorderLayout;
import java.awt.event.ActionEvent;
import java.awt.event.ActionListener;

import javax.swing.BoxLayout;
import javax.swing.ImageIcon;
import javax.swing.JButton;
import javax.swing.JFrame;
import javax.swing.JPanel;
import javax.swing.JToolBar;


public class Toolbars extends JFrame {

    public Toolbars() {

        setTitle("Toolbars");

        JToolBar toolbar1 = new JToolBar();
        JToolBar toolbar2 = new JToolBar();

        JPanel panel = new JPanel();
        panel.setLayout(new BoxLayout(panel, BoxLayout.Y_AXIS));

        ImageIcon newi = new ImageIcon(
		getClass().getResource("new.png"));
        ImageIcon open = new ImageIcon(
		getClass().getResource("open.png"));
        ImageIcon save = new ImageIcon(
		getClass().getResource("save.png"));
        ImageIcon exit = new ImageIcon(
		getClass().getResource("exit.png"));

        JButton newb = new JButton(newi);
        JButton openb = new JButton(open);
        JButton saveb = new JButton(save);

        toolbar1.add(newb);
        toolbar1.add(openb);
        toolbar1.add(saveb);
        toolbar1.setAlignmentX(0);

        JButton exitb = new JButton(exit);
        toolbar2.add(exitb);
        toolbar2.setAlignmentX(0);

        exitb.addActionListener(new ActionListener() {
            public void actionPerformed(ActionEvent event) {
                System.exit(0);
            }

        });

        panel.add(toolbar1);
        panel.add(toolbar2);

        add(panel, BorderLayout.NORTH);

        setSize(300, 200);
        setLocationRelativeTo(null);
        setDefaultCloseOperation(EXIT_ON_CLOSE);
        setVisible(true);
    }

    public static void main(String[] args) {
        new Toolbars();
    }
}
We show only one way, how we could create toolbars. Of course, there are several possibilities. We put a JPanel to the north of the BorderLayout manager. The panel has a vertical BoxLayout. We add the two toolbars into this panel.
 JToolBar toolbar1 = new JToolBar();
 JToolBar toolbar2 = new JToolBar();
Creation of two toolbars.
 JPanel panel = new JPanel();
 panel.setLayout(new BoxLayout(panel, BoxLayout.Y_AXIS));
The panel has a vertical BoxLayout.
toolbar1.setAlignmentX(0);
The toolbar is left aligned.
 panel.add(toolbar1);
 panel.add(toolbar2);

 add(panel, BorderLayout.NORTH);
We add the toolbars to the panel. Finally, the panel is located into the north part of the frame.
A vertical toobar
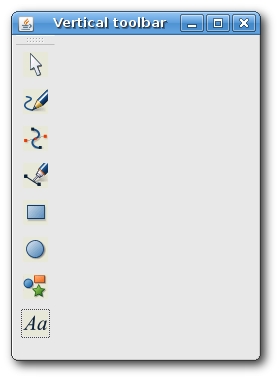
The following example shows a vertical toobar.
import java.awt.BorderLayout;

import javax.swing.ImageIcon;
import javax.swing.JButton;
import javax.swing.JFrame;
import javax.swing.JToolBar;
import javax.swing.UIManager;


public class VerticalToolbar extends JFrame {


    public VerticalToolbar() {

        setTitle("Vertical toolbar");

        JToolBar toolbar = new JToolBar(JToolBar.VERTICAL);

        ImageIcon select = new ImageIcon(
		getClass().getResource("select.gif"));
        ImageIcon freehand = new ImageIcon(
		getClass().getResource("freehand.gif"));
        ImageIcon shapeed = new ImageIcon(
		getClass().getResource("shapeed.gif"));
        ImageIcon pen = new ImageIcon(
		getClass().getResource("pen.gif"));
        ImageIcon rectangle = new ImageIcon(
		getClass().getResource("rectangle.gif"));
        ImageIcon ellipse = new ImageIcon(
		getClass().getResource("ellipse.gif"));
        ImageIcon qs = new ImageIcon(
		getClass().getResource("qs.gif"));
        ImageIcon text = new ImageIcon(
		getClass().getResource("text.gif"));

        JButton selectb = new JButton(select);
        JButton freehandb = new JButton(freehand);
        JButton shapeedb = new JButton(shapeed);
        JButton penb = new JButton(pen);
        JButton rectangleb = new JButton(rectangle);
        JButton ellipseb = new JButton(ellipse);
        JButton qsb = new JButton(qs);
        JButton textb = new JButton(text);

        toolbar.add(selectb);
        toolbar.add(freehandb);
        toolbar.add(shapeedb);
        toolbar.add(penb);
        toolbar.add(rectangleb);
        toolbar.add(ellipseb);
        toolbar.add(qsb);
        toolbar.add(textb);

        add(toolbar, BorderLayout.WEST);

        setSize(250, 350);
        setLocationRelativeTo(null);
        setDefaultCloseOperation(EXIT_ON_CLOSE);
        setVisible(true);
    }

    public static void main(String[] args) {
        try {
            UIManager.setLookAndFeel(
                UIManager.getSystemLookAndFeelClassName());
        }
        catch (Exception e) {
            System.out.println("Error:" + e.getStackTrace());
        }
        new VerticalToolbar();
    }
}
In the example, we put a vertical toolbar to the left side of the window. This is typical for a graphics applications like Xara Extreme or Inkscape. In our example, we use icons from Xara Extreme application.
JToolBar toolbar = new JToolBar(JToolBar.VERTICAL);
We create a vertical toolbar.
add(toolbar, BorderLayout.WEST);
The toolbar is placed into the left part of the window.
 UIManager.setLookAndFeel(
     UIManager.getSystemLookAndFeelClassName());
I used the system look and feel. In my case, it was the gtk theme. The icons are not transparent, and they would not look ok on a different theme.
